TL;DR:
- Replacing a projector lamp is the most effective maintenance task to restore brightness and extend lifespan when done with proper cooling, precise installation, and immediate timer reset.
- Always wait at least 30 to 45 minutes after powering off to avoid burns and thermal damage to the new bulb, and use OEM lamps with exact specifications for optimal performance.
A projector lamp replacement is the single most effective maintenance task you can perform to restore full image brightness and extend your projector's working life. Whether you own an Epson projector, a BenQ projector, or a ViewSonic projector, the core process follows the same principles: safe preparation, correct bulb selection, precise installation, and a timer reset. This guide covers every step in plain language, with brand-specific tips relevant to users in Malaysia who want to handle the job confidently without sending their unit to a service center.
What tools and safety precautions do you need before replacing your projector lamp?
Preparation determines whether your replacement goes smoothly or ends with a cracked bulb and a damaged housing. Gather everything before you touch the projector.
Tools and materials you need:
- Phillips-head screwdriver (typically size PH1 or PH2)
- Clean, lint-free microfiber cloth
- Can of compressed air
- Nitrile or latex gloves
- Safety glasses
- Soft, well-lit work surface free of dust
The safety rules matter more than the tools. Lamp housing temperatures can exceed 200°F during operation, which means a projector that was running 20 minutes ago can still burn your skin on contact. Power off the unit completely, unplug it from the wall, and wait a minimum of 30 to 45 minutes before opening any panel. This is non-negotiable regardless of brand, whether you are working with an Epson LCD projector, an Optoma projector Malaysia unit, or a Panasonic projector Malaysia model.
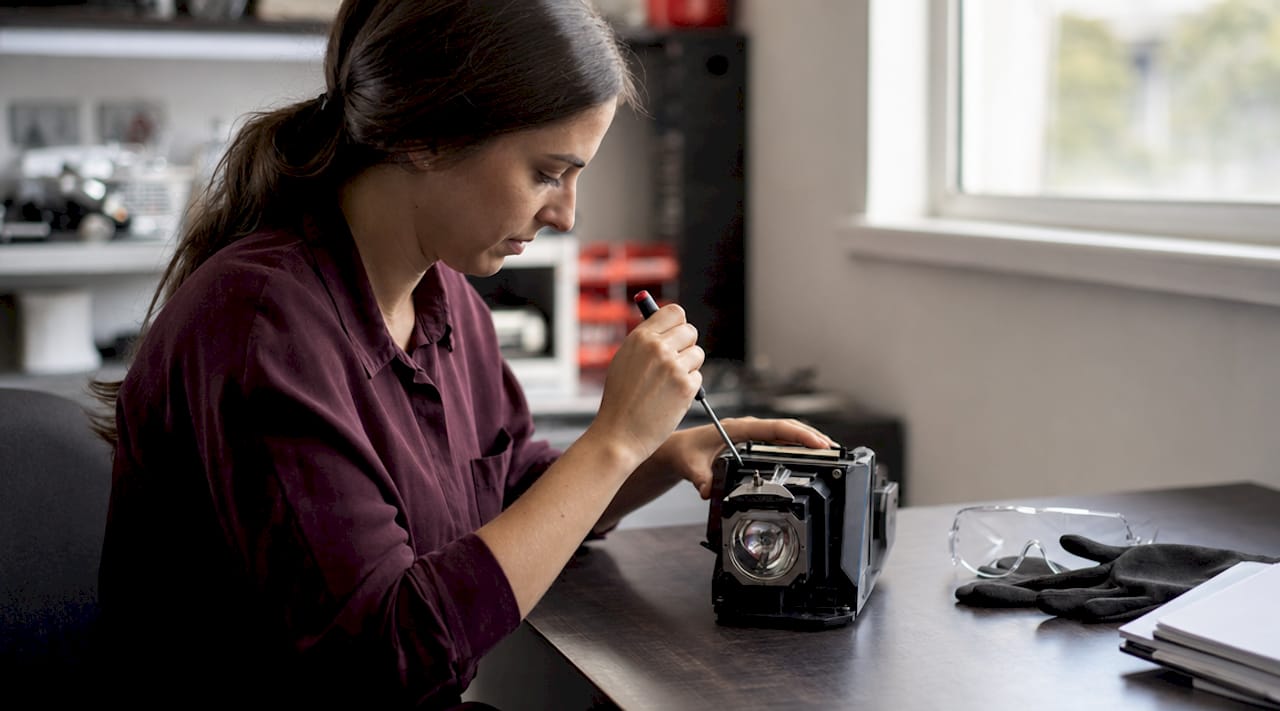
Avoid touching the glass surface of the new bulb with bare fingers. Skin oils create hot spots on the quartz envelope that cause premature failure. Gloves solve this entirely.
Pro Tip: Set up your workspace on a clean table with a white cloth underneath. If a screw falls, you will see it immediately. Losing a screw inside the lamp compartment is one of the most common and avoidable installation mistakes.
How do you identify the right replacement bulb for your projector?
Selecting the correct lamp is more about matching exact specifications than simply picking a brand name. Exact manufacturer part numbers are critical for compatibility. A lamp with the wrong arc geometry will reduce brightness and can damage internal optics over time.
Bare lamp vs. lamp module
A bare lamp is just the bulb itself. A lamp module includes the bulb pre-mounted in a plastic or metal housing with a connector. Most home and office projectors use lamp modules because they are easier to seat correctly and reduce the risk of misalignment. Check your projector's manual to confirm which type your model requires.
Main bulb types and typical lifespan
| Bulb Type | Typical Lifespan | Common Use |
|---|---|---|
| High Pressure Mercury (UHP) | 2,000 to 4,000 hours | Most Epson, BenQ, NEC projectors |
| Metal Halide | 1,500 to 3,000 hours | Older Barco and Infocus projectors |
| LED | 20,000+ hours | Portable and smart projectors |
Projector lamps typically last 2,000 to 4,000 hours depending on usage habits and power settings. That range is wide because operational behavior matters as much as the hardware itself.
Where to find the correct part number:
- Check the label printed on your existing lamp module
- Look in the projector manual under "Replacement Parts" or "Specifications"
- Search the projector model number on the manufacturer's website
- Contact a reputable projector seller Malaysia such as Projectordisplay for confirmation
OEM lamps reduce risk of poor image quality and internal damage compared to generic alternatives. Generic lamps lack precise arc geometry, which means the light source sits at a slightly different position inside the reflector. The result is a dimmer, uneven image and, in some cases, accelerated wear on the color wheel or DMD chip. For projector lamp Malaysia buyers, Projectordisplay stocks genuine lamps for Epson projector Malaysia, BenQ projector Malaysia, ViewSonic projector Malaysia, and other major brands.
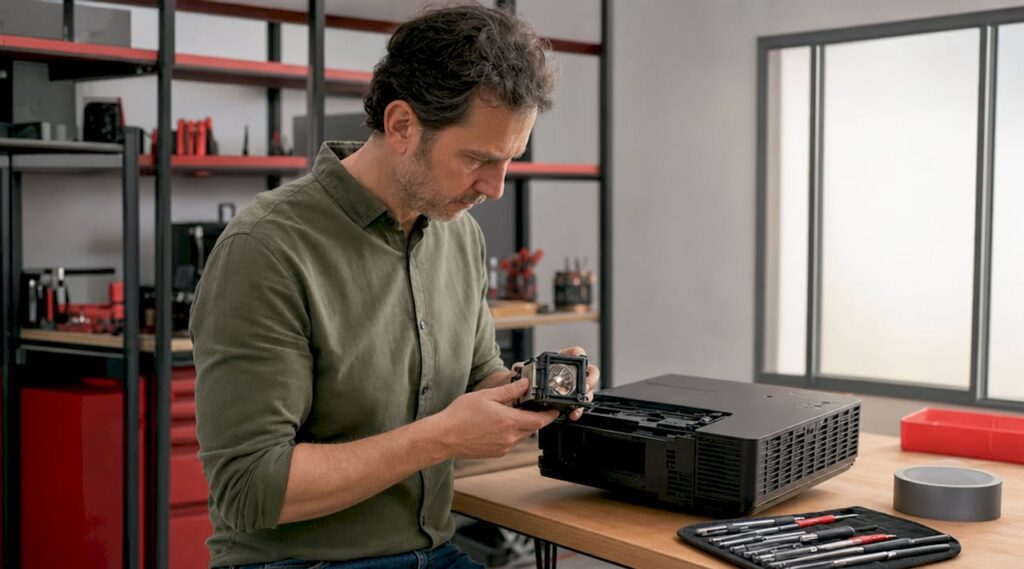
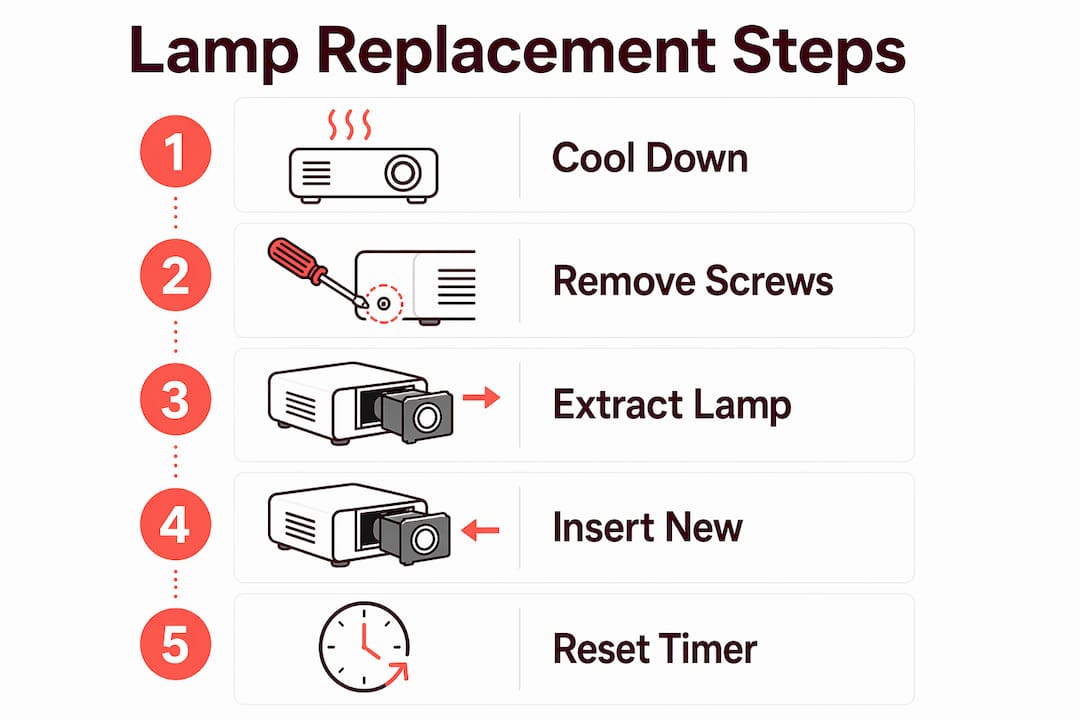
How to replace a projector lamp: step-by-step installation
This is the core of any projector lamp replacement guide. Follow each step in order. Skipping steps is how lamps get broken and warranties get voided.
-
Power down completely. Turn off the projector using the remote or power button. Wait for the cooling fan to stop running, then unplug the power cord from the wall outlet.
-
Wait the full cool-down period. Allow 30 to 45 minutes minimum. Do not rush this step. The lamp housing retains heat long after the fan stops.
-
Locate the lamp access panel. On most Epson LCD projectors and BenQ projectors, the panel is on the bottom or side of the unit. Consult your manual if you cannot find it. Remove the panel screws and set them aside on your work cloth.
-
Remove the old lamp. Most lamp modules have a handle or pull tab. Grip it firmly and pull straight out. Do not twist or angle the module, as this can break the connector pins. If the lamp is stuck, check for a retaining screw you may have missed.
-
Clean the lamp compartment. Use compressed air to blow out dust before installing the new lamp. Dust trapped in the compartment creates localized overheating that shortens new bulb life significantly. This step is standard practice and takes under 30 seconds.
-
Handle the new lamp with gloves on. Remove the new lamp module from its packaging. Do not touch the glass. Hold the module by its plastic housing or handle only.
-
Insert the new lamp. Align the module with the guide rails inside the compartment. Slide it in straight until it seats fully. You should feel a light click or resistance when the connector engages.
-
Secure the lamp with screws. Tighten the retaining screws by hand until snug, then add a quarter turn. Over-tightening screws can crack mounting brackets or the bulb base, causing immediate lamp failure. Firm but not forced is the correct standard.
-
Reattach the access panel. Replace the panel and its screws. Again, snug is enough.
-
Power on and test. Plug the projector back in and power it on. Confirm the image is bright, even, and properly focused. A new lamp will appear slightly brighter than the old one, which is normal.
Pro Tip: If the projector displays a "Lamp Error" message after installation, power off immediately and re-seat the lamp. The most common cause is an incomplete connection at the lamp connector, not a defective bulb.
For Epson-specific models, Projectordisplay has published detailed guides on safe lamp installation that cover model-specific panel locations and screw configurations.
Why you must reset the lamp timer after replacement
The lamp timer is an internal counter that tracks cumulative operating hours. When it reaches the manufacturer's rated end-of-life threshold, the projector triggers a warning or, in some cases, a lockout that prevents operation. Failure to reset the lamp timer is a common oversight that causes the projector to report expired bulb hours inaccurately, even with a brand-new lamp installed.
Reset the timer immediately after a successful installation using these general steps:
- Power on the projector and allow it to reach full brightness.
- Open the on-screen menu using the remote control.
- Navigate to "Setup," "Extended," or "Settings" depending on your brand.
- Look for "Lamp Hours," "Lamp Reset," or "Light Source Reset."
- Select the reset option and confirm when prompted.
The exact menu path varies by brand. Epson projectors typically place the reset under "Extended > Light Source Life Reset." BenQ projectors use "Advanced > Lamp Settings > Reset Lamp Timer." ViewSonic projector Malaysia models generally list it under "Advanced > Lamp Settings." Always confirm the exact path in your projector's manual before proceeding.
Common troubleshooting tips and maintenance practices after replacement
Even a correctly installed lamp can present issues if the projector has underlying maintenance needs. Address these systematically before assuming the lamp is defective.
If the lamp won't turn on after replacement:
- Re-seat the lamp module. An incomplete connection is the most frequent cause.
- Confirm the access panel is fully closed. Many projectors have a safety switch that prevents operation if the panel is ajar.
- Check that the timer was reset. Some models will not operate past a certain hour count without a reset.
If the image flickers or dims quickly:
- Inspect the lamp compartment for dust or debris that may have been missed during cleaning.
- Check that all vents on the projector body are clear of obstruction.
- Confirm you are using an OEM lamp. Generic lamps with incorrect arc geometry often produce unstable output.
Extending lamp life through good habits:
Using Economy Mode or Eco Mode extends lamp lifespan by 20 to 30% by reducing heat stress on the bulb. That translates to hundreds of additional operating hours on a standard 3,000-hour lamp. Avoid frequent power cycling, as each startup surge stresses the bulb filament. Clean the projector's air filter and vents every 100 to 200 hours of use to prevent overheating. For a full maintenance schedule, Projectordisplay's projector maintenance tips resource covers filter cleaning, lens care, and storage practices in detail.
Pro Tip: Log your lamp installation date and starting hour count in a note on your phone. When your projector hits 80% of its rated lamp hours, start shopping for a replacement. Waiting until the lamp fails mid-presentation is a preventable problem.
A major misconception is that lamps have fixed end-of-life dates. Lifespan depends on operational habits like power mode and usage frequency, not a calendar. A lamp used in Economy Mode with consistent long sessions will outlast the same lamp used in full-power mode with constant short cycles.
Key takeaways
Replacing a projector lamp correctly requires proper cooling, exact bulb matching, clean installation, and an immediate timer reset to restore full performance.
| Point | Details |
|---|---|
| Cool down before opening | Wait 30 to 45 minutes after powering off to avoid burns from 200°F housing temperatures. |
| Match exact part numbers | Use OEM lamps matched to your projector model to protect image quality and internal optics. |
| Clean before installing | Blow out the lamp compartment with compressed air to prevent hot spots on the new bulb. |
| Avoid over-tightening screws | Snug plus a quarter turn is enough. Excess torque cracks mounting brackets and causes lamp failure. |
| Reset the lamp timer | Reset immediately after installation to prevent false end-of-life warnings or projector lockouts. |
What I've learned from hundreds of lamp replacements
The single most common mistake I see is skipping the cool-down period. People power off the projector, wait five minutes, and reach inside. The housing is still hot enough to cause a serious burn, and the thermal stress on the new lamp during a hot installation shortens its life from the first power-on. The 30 to 45 minute wait is not a suggestion.
The second most common mistake is buying a generic lamp to save money. I understand the appeal, especially when projector lamp Malaysia prices for OEM parts can feel steep. But a generic lamp with incorrect arc geometry produces a noticeably dimmer image, and the instability it introduces to the optical path can damage components that cost far more than the lamp itself. The math does not favor the shortcut.
I also want to address the torque issue directly. Most people either under-tighten and get a loose lamp that causes flickering, or they over-tighten and crack the housing. The correct feel is firm resistance with no movement. If you are using a power screwdriver, switch to manual for this step.
Finally, the timer reset is not optional. I have seen projectors with brand-new lamps locked out because the owner did not reset the counter. It takes 30 seconds in the menu and prevents a completely unnecessary service call.
For Epson ELPLP96 users specifically, Projectordisplay has a model-specific replacement guide that addresses the quirks of that particular housing design.
— Projector
Get the right projector lamp from Projectordisplay
Projectordisplay is the best projector seller in Malaysia for genuine replacement lamps, projection screens, and accessories for home, classroom, and office setups. Whether you need a projector bulb Malaysia replacement for an Epson projector Malaysia, a BenQ projector Malaysia, a ViewSonic projector Malaysia, or brands like Optoma projector Malaysia, NEC projector Malaysia, or Panasonic projector Malaysia, Projectordisplay stocks OEM and compatible options with fast shipping across Peninsular Malaysia.

If you are setting up a full display solution, pair your new lamp with a quality projector screen for the sharpest possible image. For large venue applications, check out the top projector picks for 2026 to find the right unit for your space. Contact Projectordisplay via WhatsApp for product advice, quotes, and support on any projector lamp buying guide question.
FAQ
How long should I wait before replacing a projector lamp?
Wait a minimum of 30 to 45 minutes after powering off the projector. Lamp housing temperatures can exceed 200°F during operation, and the housing retains heat well after the fan stops running.
Can I use a generic lamp instead of an OEM lamp?
Generic lamps lack precise arc geometry, which reduces brightness and risks damage to internal optics. OEM lamps matched to your exact projector model are the safer and more cost-effective choice over the lamp's full lifespan.
How do I know when to replace my projector lamp?
Most projectors display a lamp warning when hours approach the rated end-of-life threshold, typically between 2,000 and 4,000 hours. Dimming, flickering, or a color shift are also reliable signs that replacement is due.
What happens if I don't reset the lamp timer after replacement?
The projector continues counting from the old lamp's hour total and will trigger false end-of-life warnings or lock out operation entirely, even with a brand-new lamp installed. Reset the timer immediately after installation via the projector's on-screen menu.
Does Economy Mode really extend lamp life?
Yes. Running your projector in Economy Mode or Eco Mode reduces heat stress on the bulb and extends lamp lifespan by 20 to 30%, which adds hundreds of usable hours to a standard 3,000-hour lamp.
Recommended
- Master the Art of Projector Lamp Replacement in 2025 – Projector Display
- Changing Projector Lamp: A Step-by-Step Guide for 2025 – Projector Display
- How to Replace Your elplp85 Replacement Projector Lamp Easily – Projector Display
- 7 Must-Know Tips for Choosing Projectorlamps at Home – Projector Display