Swapping out a projector lamp sounds simple enough and yet it is one of the most overlooked steps in projector care. Think about this—projector lamps can reach temperatures over 500 degrees Fahrenheit while in use. Most people just unscrew the panel and hope for the best, but skipping key steps or ignoring safety details can actually shorten your projector's lifespan. There are several surprising details that make the difference between a flawless lamp swap and an expensive repair bill.
Table of Contents
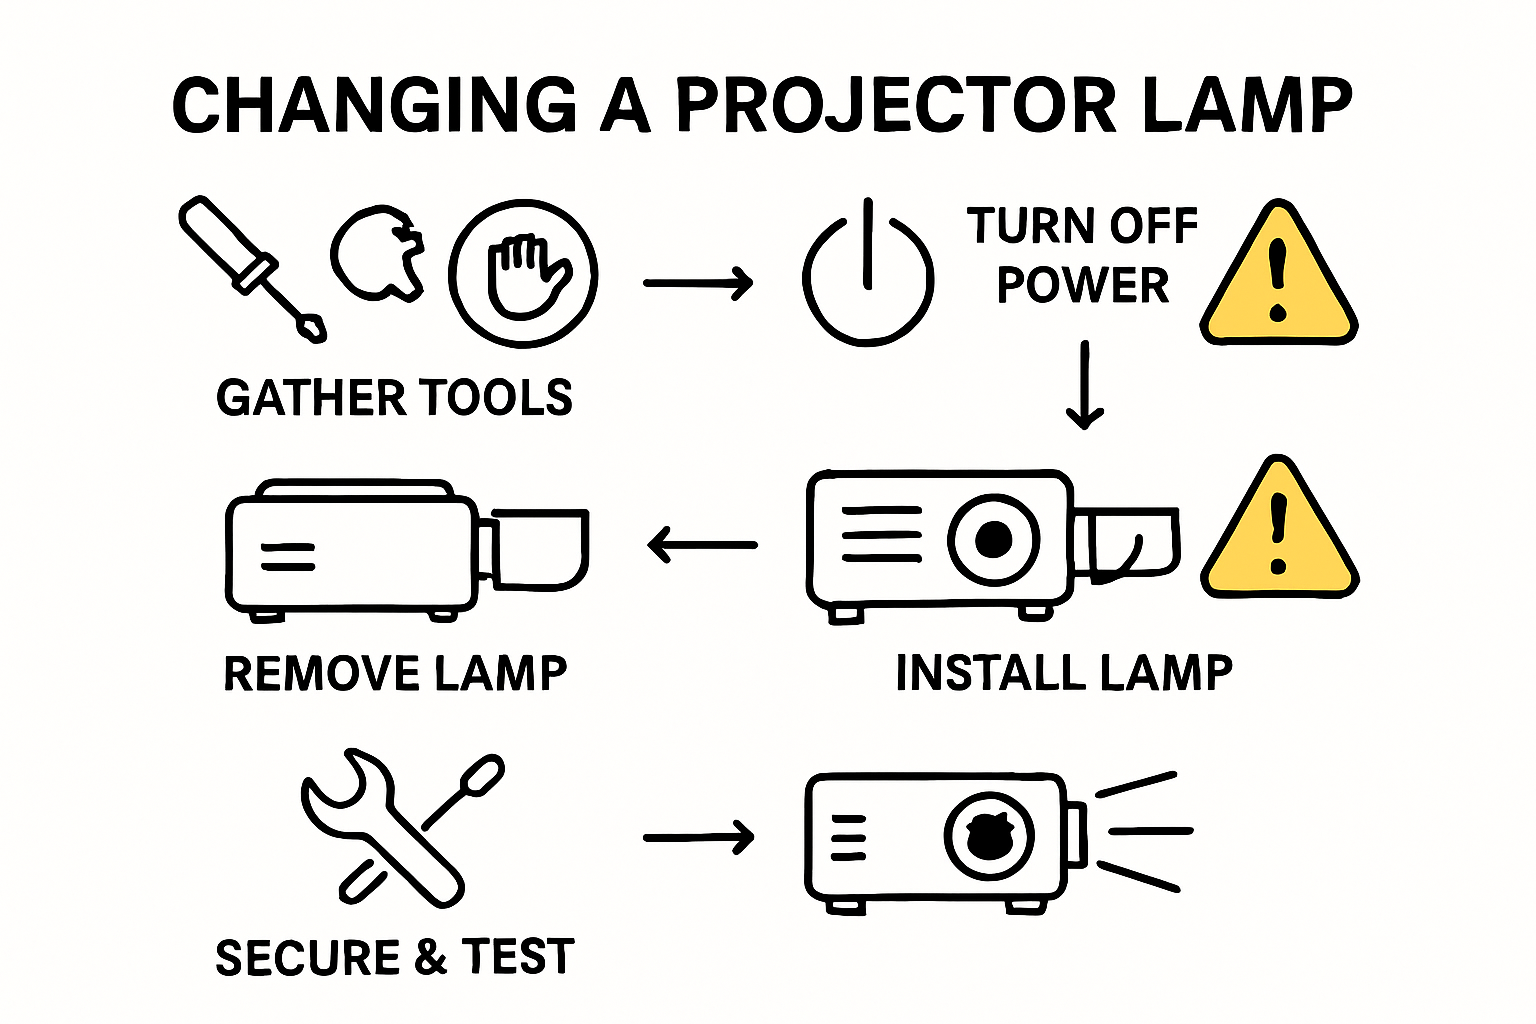
- Step 1: Gather Necessary Tools And Equipment
- Step 2: Power Off And Unplug The Projector
- Step 3: Remove The Old Lamp Carefully
- Step 4: Install The New Projector Lamp
- Step 5: Secure The Lamp And Close The Cover
- Step 6: Test The Projector And Verify Operation
Quick Summary
| Key Point | Explanation |
|---|---|
| 1. Gather necessary tools first | Assemble all required tools to ensure a smooth lamp replacement process. Include the replacement lamp, a screwdriver, and cleaning supplies. |
| 2. Ensure projector is powered off | Always power down and unplug the projector carefully before beginning any lamp replacement work for safety. |
| 3. Handle the old lamp with care | Remove the old lamp gently to avoid damage. Follow the manufacturer's instructions and avoid forcing any components. |
| 4. Install the new lamp correctly | Verify compatibility of the new lamp and align it properly to ensure optimal performance after installation. |
| 5. Test the projector thoroughly | After installation, test the projector for proper functionality by checking image quality and ensuring no warning lights appear. |
Step 1: Gather Necessary Tools and Equipment
Changing a projector lamp requires careful preparation and the right set of tools. Before diving into the replacement process, assembling the correct equipment will ensure a smooth and successful lamp swap. Your success depends on having everything ready before you begin.
Essential Tools for Projector Lamp Replacement
The key to a successful projector lamp replacement is gathering the right tools and equipment beforehand. You will need several specific items to complete this task safely and effectively. Recommended tools include:
Below is a table summarizing the essential tools and equipment needed for projector lamp replacement, along with their purposes. This helps ensure you have everything at hand before starting the replacement process.
| Tool/Equipment | Specification/Example | Purpose |
|---|---|---|
| Replacement projector lamp | Model-specific, check model number/wattage | Replace old or faulty lamp |
| Clean microfiber cloth | Lint-free, soft | Clean lamp, projector, and exterior surfaces |
| Phillips head screwdriver | Standard size, fits projector screws | Remove/secure access panel screws |
| Work gloves | Clean, lint-free | Protect hands and lamp from oils/residue |
| Soft workspace | Flat surface, soft mat/cloth | Prevent scratches and loss of small parts |
| Compressed air or soft brush | Canned air or gentle bristle brush | Remove dust and debris during replacement |
- Replacement projector lamp compatible with your specific projector model
- Clean microfiber cloth
- Phillips head screwdriver
- Work gloves to protect your hands
- Soft, clean workspace with good lighting
- Compressed air or soft brush for cleaning
Preparing your workspace is equally important as collecting the tools. Choose a clean, flat surface with ample room to work. Ensure you have good lighting and a stable area where small screws won't get lost. Lay out a soft cloth or mat to protect both your projector and work surface from potential scratches.
Safety and Preparation Considerations
Before handling the projector lamp, consider a few critical safety precautions. Always ensure the projector is unplugged and has cooled completely. Projector lamps generate significant heat during operation, so waiting at least 30 minutes after turning off the device is crucial. Wear clean work gloves to prevent oils from your skin transferring to the lamp, which can cause premature failure.
Inspect the replacement lamp carefully to confirm it matches your projector's exact specifications. Using an incompatible lamp can damage your device or result in poor performance. Check the model number, wattage, and physical dimensions to guarantee a perfect match. If you're uncertain, consult your projector's manual or contact the manufacturer directly.
By methodically gathering your tools and preparing your workspace, you set the stage for a successful projector lamp replacement. Taking these preparatory steps will help you avoid potential complications and ensure a smooth process from start to finish.
To help ensure a smooth and safe projector lamp replacement, use this checklist to verify completion of critical safety and verification steps before proceeding with installation.
| Checklist Item | How to Verify |
|---|---|
| Projector is powered off and unplugged | No lights, cord disconnected from wall |
| Projector has fully completed its cooling cycle | Fans stopped, projector cool to touch |
| Work area is clean and clear of clutter | Flat, stable surface with mat/cloth, no obstructions |
| Gloves are worn before handling the lamp | Gloved hands, new/clean gloves |
| Replacement lamp matches project specifications | Model, wattage, and dimensions confirmed against manual/specs |
| Old lamp is completely removed and intact | Module detached, no damage or resistance during removal |
| Lamp compartment is free from dust and debris | Visual inspection, clean with cloth or compressed air/brush |
Step 2: Power Off and Unplug the Projector
Safety is paramount when preparing to replace a projector lamp. This critical step ensures electrical safety and prevents potential damage to your expensive equipment. Powering off and unplugging your projector might seem straightforward, but there are specific procedures to follow that protect both you and your device.
Powering Down and Disconnecting
Begin by locating the power button on your projector. Most modern projectors have a dedicated power button that requires multiple presses or a press-and-hold method to completely shut down. Do not simply press the button once and assume the device is off. Many projectors have cooling cycles that require specific shutdown procedures to prevent internal component damage.
Once you initiate the shutdown sequence, wait patiently. The projector's internal fans will continue running to cool down the lamp and internal components. This cooling process typically takes 5 to 10 minutes, depending on your specific projector model. During this time, do not interrupt the cooling cycle by attempting to unplug the device or remove the power cord.
After the cooling cycle completes, carefully unplug the power cord from the electrical outlet, not just from the projector itself. This step eliminates any residual electrical current and provides an additional layer of safety. Gently remove the cord, ensuring you grasp the plug itself rather than pulling on the cord, which could potentially damage the cable or the plug.
Verification and Precautions
To verify the projector is completely powered down, check for these indicators:
- No active status lights or display panels
- Internal fan has completely stopped running
- Projector feels cool to the touch
- Power cord is fully disconnected from the electrical outlet
If you're working in a shared space or have curious children or pets around, consider placing a small sign or creating a physical barrier to prevent accidental interference during the lamp replacement process. This extra precaution helps maintain a safe and controlled work environment.
By meticulously following these power-off procedures, you set the stage for a safe and successful projector lamp replacement. Learn more about projector maintenance best practices to keep your device in optimal condition.
Step 3: Remove the Old Lamp Carefully
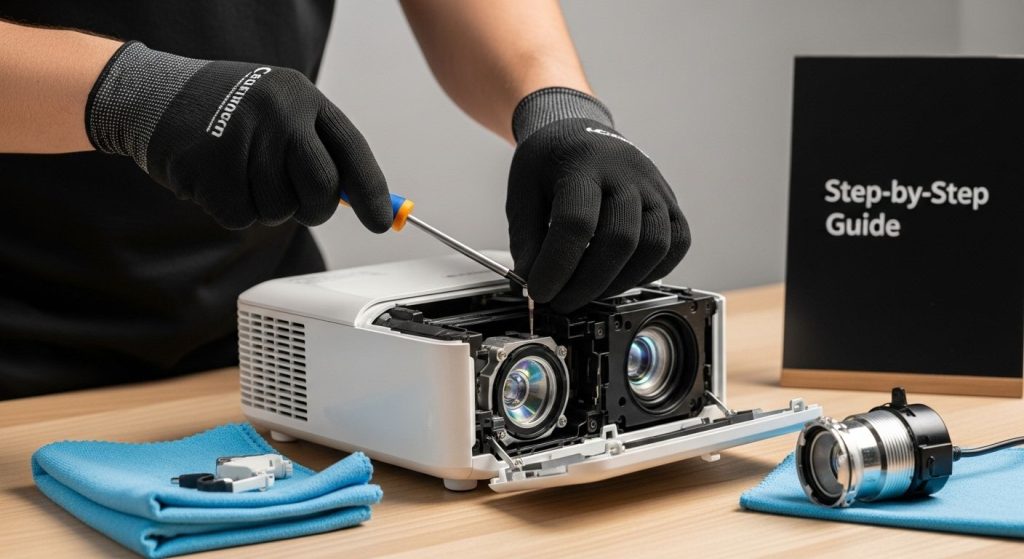
Removing the old projector lamp requires precision, patience, and careful attention to detail. This critical step demands a methodical approach to prevent damage to your expensive projection equipment and ensure a smooth lamp replacement process.
Begin by locating the lamp access panel on your projector. Most models have a clearly marked compartment, typically secured by one or two screws. Use your Phillips head screwdriver to gently remove these screws, placing them in a small container to prevent loss. Some projectors might have a sliding or hinged panel that requires a specific technique to open without applying excessive force.
Handling the Lamp Module
Once the access panel is open, you will see the lamp module. Approach this component with extreme caution. Projector lamps are delicate and can shatter or break if mishandled. Wear your clean work gloves to protect both the lamp and your hands. Look for the module's release mechanism – this could be a lever, a latch, or a set of mounting brackets that require careful manipulation.
Gently press the release mechanism while supporting the lamp module from underneath. Some projectors have specific release sequences that require pressing buttons in a particular order or holding a lever in a specific position. If you encounter resistance, do not force the module. Consult your projector's manual or explore our detailed lamp replacement guide for model-specific instructions.
As you remove the lamp module, maintain a steady hand and keep the component level. Tilting or twisting the module can cause internal damage or cause fragile components to break. Place the removed lamp on a soft, clean surface away from your workspace. Inspect the module for any visible signs of damage, such as cracks, discoloration, or warping.
Verify the removal process by checking these key indicators:
- Lamp module is completely detached from the projector
- No resistance or unusual sounds during removal
- Module appears intact and undamaged
- Original mounting area is clean and free of debris
Prepare the removed lamp for proper disposal. Many regions have specific electronics recycling guidelines for projector lamps, which often contain mercury and other hazardous materials. Check local regulations for appropriate disposal methods to ensure environmental safety.
By following these careful steps, you minimize the risk of damage and set the stage for a successful lamp replacement. Patience and precision are your best tools in this delicate process.
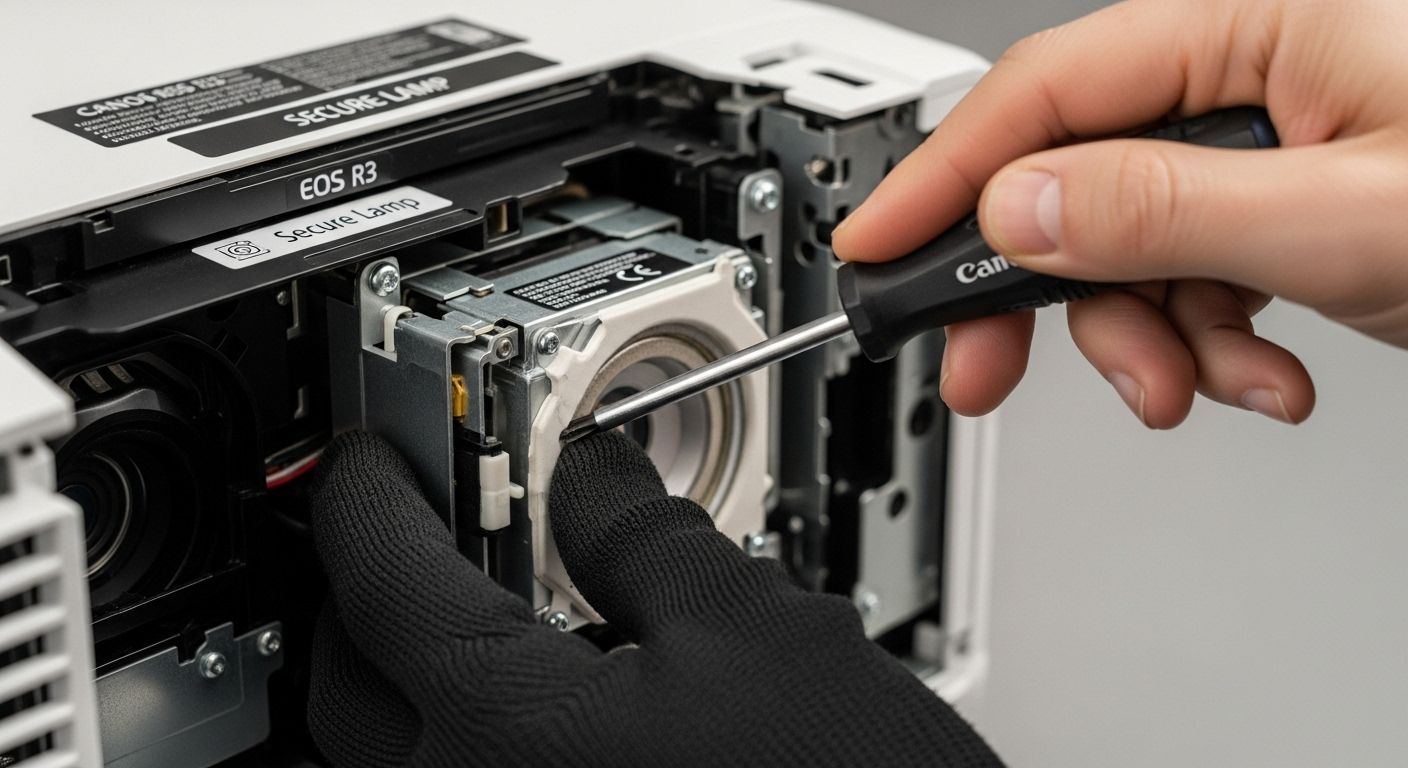
Step 4: Install the New Projector Lamp
Installing the new projector lamp represents a critical moment in your maintenance process. This step requires precision, careful alignment, and a methodical approach to ensure your projector functions optimally after the lamp replacement. Your success depends on understanding the nuanced steps of proper lamp installation.
Begin by carefully examining the new lamp module. Verify that it matches the exact specifications of your original lamp, paying close attention to size, connector type, and wattage. Hold the new lamp only by its edges, using your clean work gloves to prevent transferring skin oils that could compromise the lamp's performance. Learn more about proper lamp handling techniques to extend your projector's lifespan.
Position the new lamp module precisely over the mounting brackets inside the projector. Most lamp modules have specific orientation markers or keyed edges that ensure correct placement. Align these markers carefully to prevent incorrect installation. Gently slide the module into position, applying steady and even pressure. You should feel a slight resistance as the module settles into its designated mounting points.
Once the lamp is seated, secure it using the original mounting mechanism. This typically involves pressing down on specific points or sliding locking tabs into place. Listen for a clear clicking sound that indicates the lamp is fully and correctly installed. Some projectors require you to press a release lever or rotate a locking mechanism to confirm proper positioning.
Before fully closing the lamp compartment, perform a quick visual inspection:
- Lamp module sits flush with mounting brackets
- No visible gaps or misalignment
- Connector points appear clean and undamaged
- No loose components or additional movement
Carefully replace the access panel, ensuring you align the screw holes precisely. Tighten the screws with gentle, consistent pressure. Do not over-tighten, as this could damage the panel or create stress on the delicate lamp module.
Your methodical approach during this installation process sets the foundation for optimal projector performance. By taking your time and following each step with care, you minimize the risk of potential issues and ensure your projector will deliver high-quality images in your next presentation or movie night.
Step 5: Secure the Lamp and Close the Cover
Securing the new lamp and closing the projector's cover represents the final mechanical step in your lamp replacement journey. This crucial phase ensures that your newly installed lamp is protected and positioned correctly for optimal performance. Precision and attention to detail will prevent potential issues during future projector operation.
Carefully align the lamp access panel with its original mounting points. Most projector designs feature specific grooves or alignment markers that guide the panel into its correct position. Gentle, even pressure is key when replacing the panel. Avoid using excessive force, which could potentially damage the delicate internal components or misalign the panel.
As you position the cover, pay close attention to the screw holes. Ensure they line up perfectly with the original mounting points. Begin by inserting screws loosely, allowing them to self-align before gradually tightening. Use your Phillips head screwdriver with a light touch, rotating the screws until they are snug but not overly tight. Explore our comprehensive guide for additional projector maintenance tips to keep your device in top condition.
Before completing the installation, perform a comprehensive visual and tactile inspection. Run your fingers gently around the edges of the access panel to confirm it sits flush with the projector's body. Check for these critical indicators:
- Panel sits evenly without gaps
- Screws are secure but not over-tightened
- No visible stress marks or misalignment
- Panel feels stable when gentle pressure is applied
Once you are satisfied with the panel's positioning, take a moment to clean the exterior of the projector. Use your microfiber cloth to wipe away any fingerprints or dust that may have accumulated during the lamp replacement process. This final touch not only improves the projector's appearance but also demonstrates the care you've taken during maintenance.
Your methodical approach throughout this lamp replacement process has set the stage for optimal projector performance. By following each step with patience and precision, you've successfully completed a critical maintenance task that will help ensure your projector continues to deliver high-quality images for many presentations and viewing sessions to come.
Step 6: Test the Projector and Verify Operation
The moment of truth arrives as you prepare to test your newly installed projector lamp. This critical step determines whether your careful maintenance has successfully restored your projector's functionality. Approach this phase with a systematic and patient mindset, ready to observe every detail of the projector's performance.
Reconnect the power cord carefully, ensuring a secure connection to both the projector and the electrical outlet. Take a deep breath and press the power button, watching intently as the projector begins its startup sequence. Discover more about optimizing your projector's performance to complement your maintenance efforts.
During the initial startup, pay close attention to several key indicators. Watch for any warning lights or unusual sounds that might suggest an installation issue. The projector should power on smoothly, with the lamp illuminating without flickering or unusual delays. Most modern projectors will display a startup screen or logo, which provides an immediate visual confirmation of proper lamp installation.
Perform a comprehensive operational test by running through these critical checks:
- Image clarity and brightness
- Color consistency across the entire projection
- No unusual noises during operation
- Proper focus and image alignment
- Absence of warning messages or error indicators
If possible, display a variety of content types – a white screen, a detailed presentation, and a video with complex colors and movements. This approach helps you thoroughly assess the new lamp's performance across different scenarios. Look for any signs of image degradation, such as dimming, color shifts, or uneven illumination. These could indicate an improper installation or a potential issue with the new lamp.
Should you encounter any problems, do not panic. Carefully power down the projector, double-check the lamp installation, and ensure all connections are secure. Some projectors require a lamp timer reset, which can typically be found in the device's maintenance or settings menu. Consult your projector's manual for specific reset instructions if the lamp does not seem to be functioning correctly.
Your meticulous approach to testing ensures that your projector will continue to deliver high-quality presentations and entertainment experiences. By taking the time to verify every aspect of the lamp's operation, you've completed a crucial maintenance task that will extend the life and performance of your valuable projection equipment.
Upgrade Your Projection Experience With Confidence
Replacing a projector lamp can be stressful. You worry about choosing the right replacement or damaging your equipment during installation. The process needs the right tools and reliable components. You learned in this step-by-step guide that precision and quality make all the difference. Imagine how seamless your projector maintenance could be with support from a trusted specialist in projection technology.
Discover premium projector screens that elevate every presentation

Do not let lamp changes slow you down or compromise your viewing quality. At ProjectorDisplay.com, you get quick access to genuine projectors, replacement accessories, and expert sales support. Explore our selection to find the ideal lamp or accessory for a flawless projection setup. Take action now and keep your projector performing at its best by visiting our complete projector solutions page.
Frequently Asked Questions
How do I know when to change my projector lamp?
You should change your projector lamp when you notice signs like dimming images, flickering, or when the projector displays a warning message indicating lamp replacement is needed. Most projector lamps have a specific lifespan, commonly around 2,000 to 5,000 hours.
What tools do I need to replace a projector lamp?
To replace a projector lamp, you will typically need a replacement lamp compatible with your projector model, a Phillips head screwdriver, clean microfiber cloth, work gloves, and compressed air or a soft brush for cleaning.
What precautions should I take before changing the projector lamp?
Before changing the lamp, always power off and unplug the projector, ensuring it has cooled down completely for at least 30 minutes. Additionally, use gloves to avoid transferring oils from your skin to the lamp, which could cause premature failure.
How can I ensure that the new lamp is installed correctly?
To ensure correct installation, align the new lamp with the mounting brackets and secure it using the original mechanism. Look for an audible click to confirm it's properly seated. Also, visually inspect that there are no gaps and that the lamp is connected securely before reassembling the projector.
Recommended
- Epson Projector Lamp Guide for Malaysia Users – Projector Display
- How to Mount a Projector: Step-by-Step Guide for Malaysia 2025 – Projector Display
- Projector Lamp Lifetime: What Malaysians Need to Know in 2025 – Projector Display
- How to Mount a Projector: Step-by-Step Guide for Malaysia 2025 (Repost) – Projector Display