TL;DR:
- Choosing the correct projector mount requires measuring your projector's VESA pattern, weight, throw distance, and vertical offset accurately. Proper selection enhances image alignment, safety, and future flexibility, avoiding issues like image distortion or hardware failure. Investing in adjustable mounts and thorough installation planning ensures long-term performance and easy maintenance for any space.
Getting the wrong projector mount is one of those mistakes that looks small until the projector is already bolted to your ceiling. A poor mount choice leads to distorted images, unstable hardware, and in serious cases, a projector crash that damages both the equipment and the ceiling. Choosing the right projector mount means thinking through your projector model, room layout, ceiling structure, and long-term flexibility before you buy anything. This guide walks you through every factor that matters, whether you're setting up a home theater, a classroom projector in Malaysia, or a boardroom presentation system.
Table of Contents
- Key takeaways
- Choosing the right projector mount: what to know first
- Types of projector mounts and which one fits your setup
- How to select the right projector mount step by step
- Common installation mistakes and how to avoid them
- Long-term performance and maintenance
- My take on projector mount decisions
- Find the right mount at Projectordisplay
- FAQ
Key takeaways
| Point | Details |
|---|---|
| Know your measurements first | Check projector weight, VESA hole pattern, and throw distance before selecting any mount. |
| Match mount type to your space | Ceiling mounts suit dedicated rooms; wall mounts work better for smaller or temporary setups. |
| Never skip weight safety margins | Select a mount rated for at least 20% more than your projector's actual weight. |
| Physical alignment beats software fixes | Avoid relying on digital keystone correction, which degrades image resolution and adds noise. |
| Plan for future room changes | Adjustable mounts with tilt and swivel save time and money when your layout changes later. |
Choosing the right projector mount: what to know first
Before you look at a single product listing, you need to gather specific data about your projector and room. Skipping this step is the number one reason people end up with mounts that sort of fit but never quite work right.
Know your projector's interface and weight
Every projector has a mounting interface, and the two most common are VESA-compliant bolt patterns and the standard 1/4-20 UNC tripod thread. VESA-compliant projectors require M4 screws, while mini-projectors and portable units typically use the 1/4-20 UNC tripod thread. Using the wrong screw type is not just inconvenient. It can strip and permanently damage the threaded inserts inside your projector's body.
Projector weight is equally critical. Mounts typically support 15 kg to 25 kg with adjustable arms that accommodate hole patterns from 5.25 to 12.5 inches. The rule of thumb: always pick a mount rated for at least 20% more than your projector's weight. A projector that weighs 4 kg should be on a mount rated for at least 4.8 kg. That safety buffer accounts for vibration, cable tension, and long-term wear on the fasteners.
Throw distance and vertical offset
These two numbers control exactly where your mount goes on the ceiling or wall. Throw distance is the gap between the projector lens and the screen surface. You calculate it by multiplying your screen width by the projector's throw ratio. A projector with a 1.5:1 throw ratio projecting onto a 2-meter wide screen needs to sit 3 meters from the screen. If your mount doesn't position the projector at that exact distance, the image either won't fill the screen or will extend past it.
Vertical offset and lens shift determine the height placement of your mount. Most projectors are not designed so the image center aligns with the lens center. Ignoring vertical offset when you install a ceiling mount results in an image that is either too high or too low on the screen, regardless of how much you physically tilt the unit.
Pro Tip: Download your projector's spec sheet before shopping for a mount. The throw ratio, VESA hole pattern dimensions, and vertical offset value are all there. Matching those numbers to mount specs takes ten minutes and saves hours of frustration later.
Room structure matters just as much as projector specs. Different ceiling types require different hardware: drywall requires toggle bolts or studs, concrete needs masonry anchors, and drop ceilings in classrooms or offices often need special adapter frames for reinforcement.
Types of projector mounts and which one fits your setup
Once you have your measurements, the next decision is mount type. Each category solves a different problem.
Ceiling mounts
Ceiling mounts create clean, unobtrusive setups ideal for dedicated home theaters. The projector stays out of the way, cables can be routed through the ceiling for a clean look, and the viewing angle is consistent from any seat in the room. The trade-off is installation complexity. You need to locate structural support, run cable, and get the positioning right before the mount is secured. Any mistake at that stage is expensive to fix.
For classroom projectors in Malaysia and dedicated business conference rooms, ceiling mounts are usually the best long-term choice. The setup is permanent and stable, and it keeps the projector safe from accidental bumps or movement.
Wall mounts
Wall mounts are better suited for smaller rooms, rental properties, or setups where ceiling access is difficult. They install faster than ceiling mounts and make the projector easier to access for lamp or bulb replacement. The downside is that wall placement limits your flexibility on throw distance, and the image angle can make alignment trickier in wider rooms.
If you're setting up a projector in a small apartment or a seminar room with a rear wall close to the screen, a wall mount often solves the problem more simply than a ceiling installation.
Portable mounts and tripods
Tripod stands and portable mounts give you maximum flexibility. They are the right choice for presenters who move between venues, pop-up event spaces, or home users who don't want to drill into their ceiling. The trade-off is stability. A tripod on an uneven floor introduces vibration, and any bump to the stand shifts your image. For a fixed home theater or classroom projector, a tripod is the wrong tool.
Adjustable and specialized mounts
Adjustable mounts with tilt, swivel, and rotation features are worth the extra cost for almost any permanent installation. When seating arrangements change or you switch to a new screen, these mounts let you reposition the projector without remounting the entire bracket. Motorized lifts go even further, retracting the projector into the ceiling when not in use. These are expensive and best reserved for high-end home theaters or executive boardrooms.
| Mount type | Best for | Installation difficulty | Flexibility |
|---|---|---|---|
| Ceiling mount | Home theaters, classrooms, boardrooms | High | Low once installed |
| Wall mount | Small rooms, rentals, easier access | Medium | Medium |
| Portable/tripod | Mobile presenters, events, temporary use | Low | High |
| Adjustable ceiling | Rooms that change layout frequently | High | High |
| Motorized lift | Premium home theaters, executive spaces | Very High | Very High |
Pro Tip: If you're using a short-throw projector, verify that the mount allows you to position the projector very close to the screen without the arm or bracket appearing in the projection. Not all standard ceiling mounts accommodate short-throw geometry.
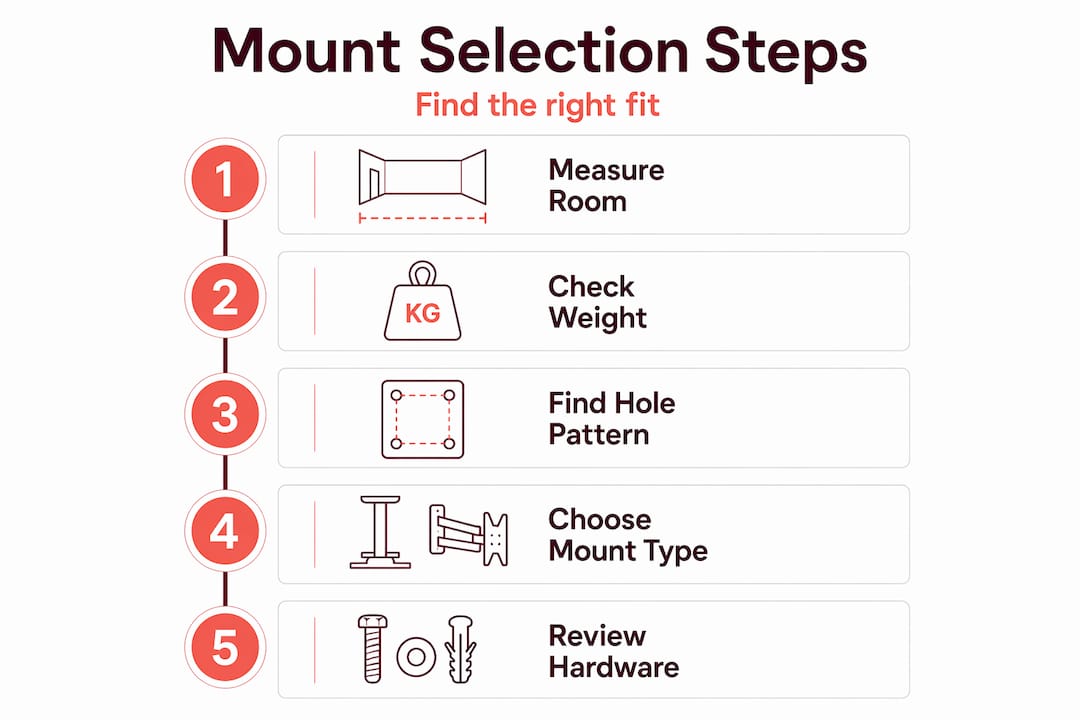
How to select the right projector mount step by step
Here is the exact sequence to follow before you buy any mount. This process works whether you're setting up a home theater, a best classroom projector installation, or a business presentation room.
-
Measure your projector's mounting holes. Note the distance between holes horizontally and vertically. This is your VESA pattern. Write down the screw diameter and thread type from the projector manual.
-
Weigh your projector. Use a luggage scale if you don't have the spec sheet. Add the weight of any attached cables and accessories to get a realistic load number.
-
Calculate your throw distance. Multiply screen width by the projector's throw ratio. Mark that distance from the screen surface on your floor, then translate it to the ceiling mount position.
-
Account for vertical offset. Check the projector spec sheet for lens offset percentage. This tells you how far above or below the lens center the image will land, which determines the correct mounting height.
-
Inspect your ceiling or wall structure. Use a stud finder to locate joists. If you have concrete ceilings, mark anchor points. If you have a drop ceiling, plan for an adapter plate that attaches to the structural grid above.
-
Verify mount weight capacity. Apply the 20% safety margin rule. A lever arm effect increases stress on ceiling joists when a projector extends outward from the mount, so check that both the mount and the anchors meet the load requirements.
-
Plan cable management. Decide whether cables run inside the ceiling, along a cable raceway, or through a conduit. This choice affects which mount style works best and whether you need a mount with integrated cable guides.
Pro Tip: When calculating mounting height, add the projector's height dimension to your throw distance calculation. Many people forget that the lens is not at the bottom edge of the projector body, which shifts the actual mounting point higher than expected.
| Measurement | Where to find it | Why it matters |
|---|---|---|
| VESA hole pattern | Projector manual or underside label | Confirms mount plate compatibility |
| Projector weight | Spec sheet or luggage scale | Determines safe mount weight rating |
| Throw ratio | Spec sheet | Sets correct distance from screen |
| Vertical offset % | Spec sheet | Sets correct mounting height |
| Ceiling joist location | Stud finder | Confirms safe anchor points |
Common installation mistakes and how to avoid them
Even when people buy the right mount, they often install it in ways that create problems. Here are the failures that show up most often.
-
Relying on digital keystone correction for alignment. Digital keystone correction degrades image resolution and increases fan noise because the projector has to process the image electronically. If your mount is positioned correctly, you should rarely need more than a tiny keystone adjustment. If you're using more than 5 to 10 degrees of correction, the mount position is wrong. Fix the physical placement instead of leaning on the software.
-
Using wrong screw sizes. Incorrect screw types permanently damage internal threads. Always cross-reference the screw spec in both the projector manual and the mount manual before you tighten anything.
-
Ignoring drywall anchor limitations. Standard drywall cannot support a suspended projector without a stud or a rated toggle bolt. Using inadequate anchors is a safety hazard that can result in the projector falling mid-presentation or mid-movie.
-
Skipping the weight safety margin. Mounting at exactly the rated limit of the mount sounds fine on paper. In reality, vibration from fans, cable tension, and thermal expansion all add load over time. The 20% buffer is not optional.
-
Not accounting for lamp access. Some mounts position the projector in a way that makes it nearly impossible to replace the projector lamp or bulb without dismounting the entire unit. Check which side the lamp door is on before finalizing mount position. You can learn more about minimizing alignment errors to get the most from your setup.
The most overlooked installation mistake is rushing past the structural inspection. A mount that is correctly specified but anchored to weak drywall is more dangerous than a slightly undersized mount anchored to a solid joist.
Long-term performance and maintenance
Choosing the right mount is not a one-time event. The setup needs periodic attention to stay safe and effective.
- Inspect all mount fasteners every six months. Vibration from the projector's cooling fan gradually loosens bolts over time.
- Check the mount's tilt and swivel lock mechanisms. If the projector has drifted from its original angle, readjust and re-tighten.
- Clean around the mount bracket and cable management points. Dust buildup near a ceiling mount can migrate into the projector's air intake.
- When you replace a projector lamp or bulb, check whether the mount position makes the access panel reachable. If not, document the steps needed to partially lower or rotate the projector safely.
- If you upgrade to a heavier projector model, do not assume your existing mount is still rated for the new weight. Recheck the capacity against the new projector's specs before remounting.
- Watch for signs that a mount upgrade is needed: visible flexing under load, stripped adjustment screws, or a mount that no longer holds its angle after tightening.
My take on projector mount decisions
I've watched people spend thousands on a best projector brand in Malaysia and then lose most of that value because the mount was wrong. The pattern is always the same. The projector gets installed, the image looks a little off, and then someone dials in 15 degrees of keystone correction and calls it good. Six months later, the image quality has noticeably degraded and no one can figure out why.
Physical alignment and mount quality will always outperform software corrections. I've seen VESA patterns mismatched, screws cross-threaded, and toggle bolts installed in walls that couldn't support a coat hook, let alone a projector. These are not beginner mistakes. They happen to people who know enough to set up a projector but not enough to treat the mounting hardware as seriously as the projector itself.
My strongest recommendation is to plan for room changes from day one. An adjustable mount costs a little more, but it lets you adapt when you rearrange seating, switch to a different screen size, or replace the projector with a newer model. Locking yourself into a fixed mount to save a hundred ringgit is a false economy when you factor in the labor of dismounting and remounting later.
The Malaysian market has a solid range of projector mounts available, including options that work with Epson projector units, BenQ models, and popular short-throw projectors. The key is matching specs, not matching brand names on the box.
— Projector
Find the right mount at Projectordisplay

Projectordisplay is Malaysia's go-to source for projector mounts, projector screen Malaysia options, and all the accessories you need to complete a proper setup. Whether you're buying for a home theater, fitting out a classroom, or equipping a corporate presentation room, the catalog covers ceiling mounts, wall mounts, and portable options across a range of load capacities and compatibility specs.
Need help identifying the right mount for a specific projector model? The team at Projectordisplay responds via WhatsApp and can confirm compatibility before you order. Fast shipping across Peninsular Malaysia means your setup doesn't sit waiting. Browse the full selection and current sale products to find the mount that fits your projector and your budget today.
FAQ
What is the most important factor when choosing a projector mount?
The technical trinity for mount selection is VESA hole pattern measurements, projector weight with a 20% safety margin, and vertical offset. Getting all three right before you buy removes most of the guesswork from installation.
Can I use a wall mount instead of a ceiling mount?
Yes, and wall mounts work particularly well for smaller rooms or rental setups. They are easier to install and allow better access to the projector for maintenance, but they offer less flexibility on throw distance in wider spaces.
Why should I avoid digital keystone correction for alignment?
Digital keystone correction degrades resolution and forces the projector to work harder, increasing fan noise and heat output. Physical mount positioning should always be adjusted first, with keystone used only as a minor fine-tuning tool.
How do I know if my ceiling can support a projector mount?
Use a stud finder to locate joists and anchor into solid wood or concrete wherever possible. Different ceiling materials require specific anchor hardware, and drop ceilings typically need reinforcement adapters before any mount can be safely installed.
What screw size do most projectors use for ceiling mounts?
VESA-compliant projectors use M4 screws, while smaller portable projectors typically use the 1/4-20 UNC thread. Using the wrong screw type can permanently strip the internal threads, so always verify the spec in your projector manual before installation.
Recommended
- Optimize Your Home Theater with Projector Mounting Options – Projector Display
- How to Mount Projector for Optimal Home Viewing Experience – Projector Display
- How to Install a Projector Mount for Perfect Viewing – Projector Display
- Projector ceiling mount guide: optimize your home theater – Projector Display