
Did you know that even a small misalignment can cause your projector image to lose sharpness and show visible distortion? Proper keystone correction is a skill that helps you achieve crisp visuals in home theaters and offices alike. Whether you are mounting a new projector or fine-tuning your setup, understanding these proven steps saves time, protects image quality, and creates that perfect rectangular picture on your screen.
Table of Contents
- Step 1: Position Your Projector For Optimal Angle
- Step 2: Activate Keystone Correction On Your Projector
- Step 3: Adjust Vertical And Horizontal Keystone Settings
- Step 4: Fine-Tune Image Alignment For Clarity
- Step 5: Verify Image Quality And Symmetry
Quick Summary
| Key Point | Explanation |
|---|---|
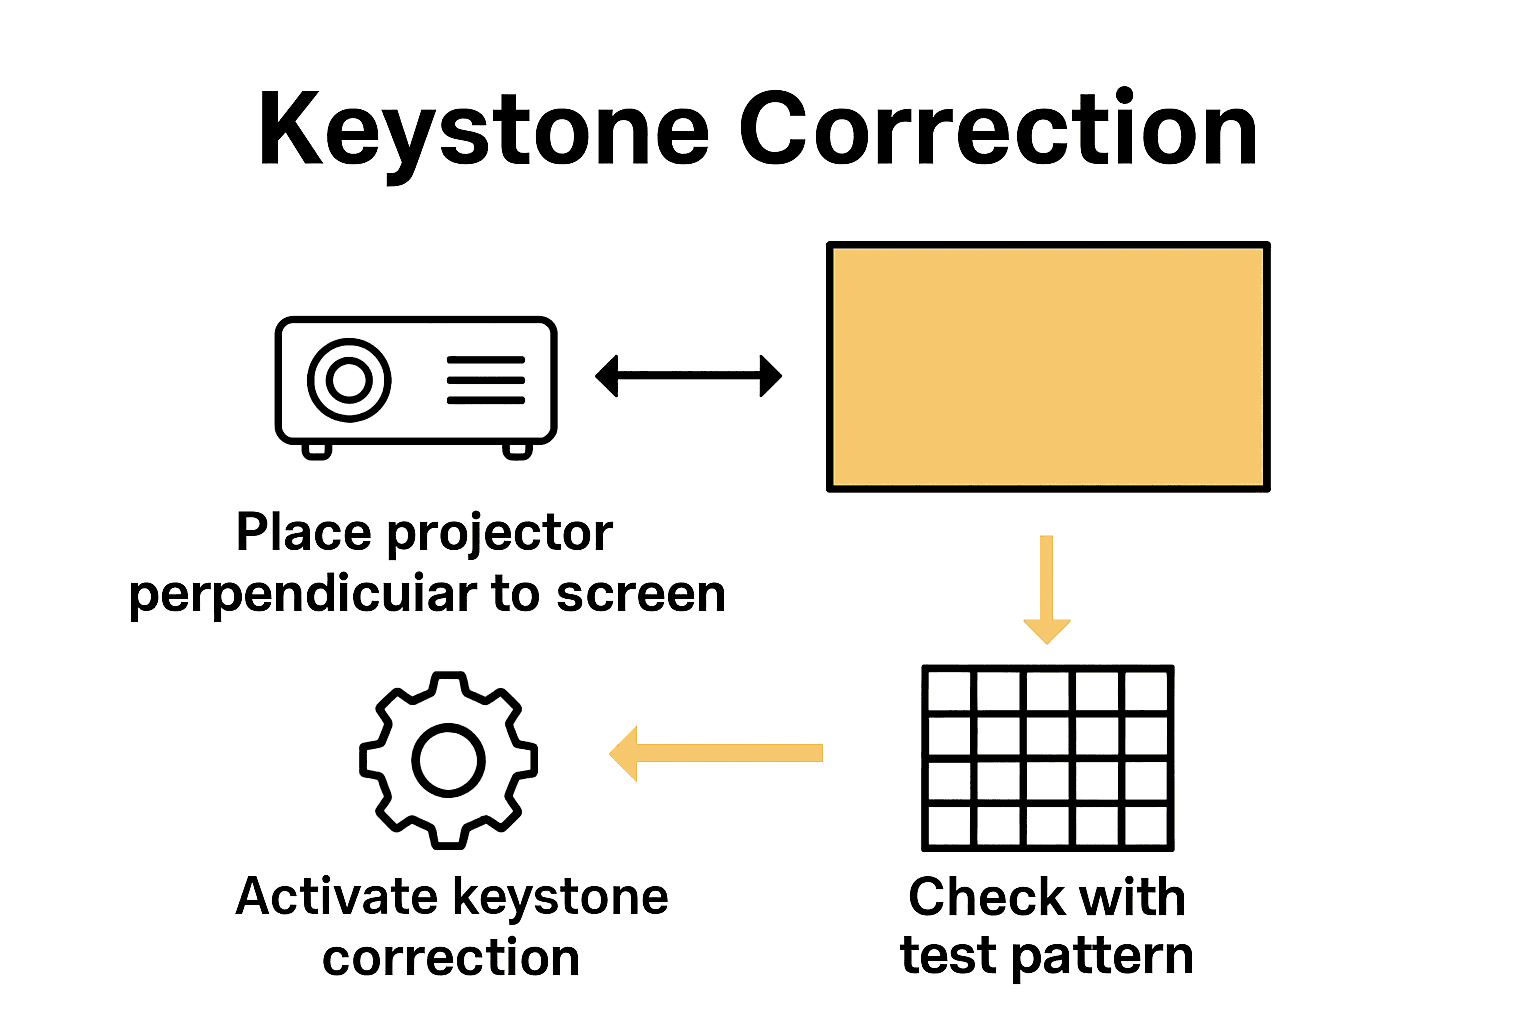
| 1. Position Projector Perpendicularly | Place your projector directly perpendicular to the screen to improve image quality and minimize keystone correction needs. |
| 2. Use Keystone Correction Sparingly | Activate keystone correction only when necessary, as excessive use can diminish image sharpness and clarity. |
| 3. Make Small Adjustment Increments | When adjusting keystone settings, use small increments to ensure the image retains maximum clarity and precision. |
| 4. Utilize Built-in Test Patterns | Assess your image quality with built-in test patterns to verify symmetry and correct any remaining distortions effectively. |
| 5. Physically Reposition When Necessary | Prioritize physical adjustments over digital corrections for the best alignment and crisp image quality. |
Step 1: Position Your Projector for Optimal Angle
Positioning your projector correctly is the foundation for achieving perfect image quality and minimizing the need for digital keystone correction. According to HomeTheaterGeek, the key is to place your projector perpendicular to the screen while ensuring precise horizontal and vertical centering.
To achieve optimal placement, start by mounting your projector at the same height as the center of your projection screen. Aim to create a direct 90-degree angle between the projector lens and the screen surface. This means the projector should be positioned parallel to the screen, without any tilting up or down. If you need to adjust the height, consider using an adjustable mount that allows fine-tuning of the projector's position. As HomeTheaterGeek recommends, utilizing adjustable mounts can significantly aid in precise positioning, which ultimately reduces your reliance on digital keystone correction.
A pro tip for home theater enthusiasts: measure the distance between your projector and screen carefully. Most projectors have markings or guidelines in their manual indicating the optimal throw distance for different screen sizes. By following these specifications, you will minimize geometric distortion and maintain image sharpness. Remember that even small angle deviations can result in noticeable image warping, so take your time to get the positioning just right.
Step 2: Activate Keystone Correction on Your Projector
Keystone correction is an essential feature that helps you adjust your projected image when your projector cannot be perfectly positioned. According to TCL, most modern projectors offer both automatic and manual keystone correction options to help you achieve a perfectly rectangular image.
To manually activate keystone correction, you typically have two primary methods. As Epson Support recommends, you can either use the physical buttons on the projector or access the menu system through the remote control. For most projectors, this involves pressing the up or down buttons on the device to adjust the image alignment. Alternatively, navigate to the projector settings menu where you will find options like Settings > Projector > Image Correction > Manual Keystone Correction.
A crucial tip for maintaining image quality: use keystone correction sparingly. While this feature helps correct image distortion, excessive correction can slightly reduce image sharpness and clarity. Some projectors automatically perform keystone correction when powered on or relocated, so check your specific model's default settings.
 If possible, physical positioning remains the best method for achieving a perfectly aligned image. For more in-depth guidance on optimizing your projector setup, check out our guide on calibrating projector image quality.
Step 3: Adjust Vertical and Horizontal Keystone Settings
Keystone correction allows you to fine-tune your projected image geometry when your projector cannot be perfectly aligned with the screen. According to Epson Support, most projectors provide the ability to adjust image shape within a range of ±3° both horizontally and vertically.
To make these adjustments, locate the keystone correction buttons on your projector or remote control. As ProjectorCentral recommends, press the dedicated Keystone button to access the adjustment dialog box. Use the arrow buttons to modify the image shape. When adjusting, start with small corrections and observe how the image transforms. Vertical keystone correction helps when your projector is positioned higher or lower than the screen center, while horizontal correction assists when the projector is positioned at an angle to the screen.
A critical tip for maintaining image quality: avoid extreme keystone corrections. While these settings provide flexibility, significant adjustments can reduce image sharpness and overall picture clarity. If possible, physically reposition your projector for the most accurate projection. Remember that minor physical repositioning will always produce better results than heavy digital keystone correction. How to calibrate projector image quality can provide additional insights into achieving optimal projection setup.
Step 4: Fine-Tune Image Alignment for Clarity
Achieving perfect image alignment requires precise adjustments beyond basic keystone correction. Epson Support recommends accessing advanced geometric correction settings to ensure your projected image looks crisp and professional.
To fine-tune your image, navigate through your projector's settings menu. As ProjectorCentral suggests, start by pressing the Keystone button on your remote control or projector cabinet. Look for options like Geometric Correction or H/V Keystone settings. Use the arrow buttons to make subtle adjustments that will help square up your image. Pay close attention to the corners and edges of the projection, making small incremental changes to achieve the most rectangular and sharp image possible.
A critical tip for maintaining image quality: less is more when it comes to correction. Each adjustment can potentially reduce overall image sharpness, so aim for minimal intervention. If you find yourself making significant corrections, it might be more effective to physically reposition your projector. For those seeking deeper insights into achieving optimal projection, our guide on calibrating projector image quality offers comprehensive techniques to maximize your visual experience.
Step 5: Verify Image Quality and Symmetry
After making keystone corrections, it is crucial to verify that your projected image meets professional visual standards. Epson Support recommends utilizing your projector's built-in test pattern feature to comprehensively assess image quality and symmetry.
To perform a thorough verification, access your projector's Settings menu and activate the test pattern display. As ProjectorCentral suggests, carefully examine the projected image for any remaining geometric distortions. Look specifically at the edges and corners of the test pattern, checking that lines are straight, corners form perfect right angles, and the overall shape appears perfectly rectangular. Pay special attention to the symmetry between vertical and horizontal lines, ensuring no skewing or warping remains after your keystone adjustments.
A pro tip for achieving precision: use grid or alignment test patterns if available in your projector settings. These specialized patterns make it easier to spot even minor imperfections. If you notice persistent image distortion, consider readjusting your physical projector placement rather than relying solely on digital correction. For more comprehensive insights into optimizing your projection setup, our guide on calibrating projector image quality offers additional expert techniques to enhance your viewing experience.
Achieve Flawless Projection with the Right Gear from ProjectorDisplay.com
Struggling with keystone correction challenges can be frustrating when you want crisp, perfectly aligned images for your home theater or workspace. This article highlights the importance of precise projector positioning and minimal digital correction to keep your visuals sharp and distortion-free. If you are ready to eliminate keystone woes and enhance your viewing experience, the right tools make all the difference.
Explore our wide selection of high-quality projector screens designed to match your projector perfectly, ensuring optimal image geometry and clarity. Combine this with carefully selected projectors from ProjectorDisplay.com to meet your specific needs whether for entertainment or presentations.

Don't settle for images that fall short of your expectations. Visit ProjectorDisplay.com now to find cutting-edge projectors and accessories tailored for flawless display results. Take control of your projection setup today and see how professional-grade equipment can transform your viewing experience!
Frequently Asked Questions
How do I position my projector for optimal keystone correction?
To position your projector correctly, mount it at the same height as the center of your screen and ensure it's perpendicular to the surface. Measure the distance between the projector and screen according to the model's specifications to achieve the best image quality.
What is the best way to manually activate keystone correction on my projector?
You can manually activate keystone correction using the physical buttons on your projector or the remote control. Navigate to the projector settings and select Manual Keystone Correction to adjust the image alignment.
How do I adjust vertical and horizontal keystone settings accurately?
To adjust vertical and horizontal keystone settings, access the keystone correction buttons on your projector or remote control. Make small adjustments by pressing the up or down buttons until the image appears rectangular, ensuring minimal distortion.
What are the critical steps to fine-tune image alignment for clarity?
To fine-tune image alignment, go into your projector's settings menu and look for geometric correction options. Adjust subtly while closely observing the corners and edges of the image to ensure it is both sharp and perfectly aligned.
How can I verify the quality and symmetry of my projected image?
You can verify image quality and symmetry by using your projector's built-in test pattern feature. After making adjustments, check that the lines are straight and corners are right angles, indicating that the image is correctly aligned.
Is there a way to avoid excessive digital keystone correction?
To avoid excessive digital keystone correction, focus on physically positioning your projector as accurately as possible. Minor adjustments should be made rather than relying on digital correction, which can decrease image sharpness.