Designing your home theater can quickly feel overwhelming with so many different projectors and features to choose from. Whether you are working with a brightly lit living room in Kuala Lumpur or a dedicated, dark theater room elsewhere in Malaysia, finding the right projector makes all the difference. The challenge is matching your space and viewing needs to the technology, specs, and setup that will truly deliver cinematic results at home.
This guide gives you a clear path to creating an immersive projector-based home theater, covering everything you need to know about projector technology, key specifications, and setup strategies. You will discover practical steps, proven tips, and expert advice for every stage—from choosing the perfect projector type for your room to optimizing placement and audio. Get ready to unlock insider knowledge that transforms your space into a stunning, movie-ready environment.
Table of Contents
- Choose The Right Projector Type For Your Space
- Key Features: Resolution, Brightness, And Contrast
- Understanding Throw Distance And Room Size
- Wireless Connectivity For Easy Streaming
- Optimizing Your Projector Setup And Screen Placement
- Audio Solutions For Enhanced Theater Sound
- Maintenance Tips For Long-Lasting Performance
Quick Summary
| Takeaway | Explanation |
|---|---|
| 1. Choose the right projector type | Match the projector technology to your room's lighting and layout for optimal viewing experience. |
| 2. Focus on resolution, brightness, and contrast | Prioritize high resolution, adequate brightness, and a strong contrast ratio for immersive visuals. |
| 3. Measure throw distance accurately | Calculate precise throw distance for projector placement to ensure correct image size and quality. |
| 4. Optimize audio for an enhanced experience | Invest in quality audio systems to complement visuals and elevate your home theater performance. |
| 5. Regular maintenance is essential | Perform routine cleaning and checks to maintain projector performance and prolong its lifespan. |
1. Choose the Right Projector Type for Your Space
Your room's layout and lighting conditions determine which projector technology will deliver the best viewing experience. Different projector types handle light, color, and motion differently, so matching the right type to your space is crucial for immersive home theater.
Three main projector technologies dominate the home theater market. Each has distinct strengths that affect image quality and performance in your specific environment.
DLP Projectors (Digital Light Processing)
DLP uses tiny mirrors to reflect light and create images. These projectors excel at producing sharp, high-contrast images with minimal motion blur, making them ideal for fast-action movies and sports.
DLP benefits for home theater include:
- Sharp image clarity and crisp text display
- Excellent motion handling for action scenes
- Compact, lightweight designs perfect for smaller rooms
- Long-lasting lamp technology
LCD Projectors (Liquid Crystal Display)
LCD projectors pass light through liquid crystal panels to generate images. These projectors are known for producing vibrant, colorful pictures with excellent brightness levels.
LCD advantages for your home include:
- Bright, color-rich imagery ideal for rooms with ambient light
- Affordable pricing for quality home theater systems
- Reliable performance across various content types
- Good value for residential installations
LCOS Projectors (Liquid Crystal on Silicon)
LCOS combines LCD and reflective technology for premium image quality. These projectors deliver smooth color transitions and outstanding contrast ratios, perfect for darker dedicated theater rooms.
LCOS strengths include:
- Superior contrast ratios for deeper blacks
- Smooth gradation between colors
- Premium image quality for cinematic experiences
- Excellent for dark viewing environments
Your choice depends on your room setup. Understanding different projector technologies helps you match the right type to your space's lighting and your viewing priorities. If your room has windows or ambient light, LCD projectors deliver brighter images. For a dark, dedicated theater room, LCOS provides cinema-quality contrast and color depth.
Matching your projector type to your room's lighting conditions and viewing priorities is the foundation for achieving immersive, high-quality home theater experiences.
Consider also your content preferences. Action movie enthusiasts benefit from DLP's superior motion handling. Movie lovers wanting vibrant color accuracy should explore LCOS options. Sports fans and gamers appreciate DLP's sharp detail and responsiveness.
Pro tip: Visit a local best projector seller in Malaysia to see different projector types in action before purchasing, ensuring you select the technology that matches your specific room conditions and viewing preferences.
2. Key Features: Resolution, Brightness, and Contrast
Three core specifications determine whether your home theater projector delivers the immersive viewing experience you want. Resolution, brightness, and contrast ratio work together to create sharp, vibrant images with stunning depth.
These specifications directly impact your viewing pleasure across all content types. Understanding how each one functions helps you make an informed investment decision.
Resolution: Clarity and Detail
Resolution measures the number of pixels your projector displays. Higher resolution means sharper images with finer details, bringing movies and games to life with stunning clarity.
Understanding resolution in projectors reveals that 1080p (Full HD) delivers excellent quality for most home theater applications. However, 4K resolution offers noticeably sharper images on larger screens, especially when viewing from closer distances.
Resolution benefits for home theater include:
- 1080p: Great quality, affordable pricing, suitable for screens under 120 inches
- 2K: Enhanced detail for medium to large screens
- 4K: Maximum clarity and sharpness for premium installations
- Native resolution directly affects image quality across all content
Brightness: Visibility in Your Room
Brightness, measured in lumens, determines how bright your projected image appears. A projector with adequate lumens ensures a visible, vibrant picture regardless of your room's lighting conditions.
Home theater brightness recommendations depend on your room setup. Dark, dedicated theater rooms need 1,500 to 2,000 lumens. Rooms with windows or ambient light require 2,500 to 3,500 lumens for optimal image visibility.
Brightness considerations include:
- Dimly lit rooms need 1,000-2,000 lumens
- Moderately lit rooms need 2,000-3,000 lumens
- Well-lit rooms need 3,000+ lumens
- Higher lumens preserve color accuracy in brighter environments
Contrast Ratio: Depth and Dimension
Contrast ratio represents the difference between the brightest whites and darkest blacks your projector can produce. A higher contrast ratio creates deeper blacks, more vibrant colors, and greater visual depth.
The contrast ratio significantly influences perceived image quality and cinematic feel. Static contrast ratios typically range from 5,000:1 to 15,000:1 for home theater projectors. Higher ratios deliver superior color vibrancy and shadow detail.
Contrast impacts your viewing experience through:
- Deeper, richer blacks for dramatic scenes
- More vibrant color reproduction
- Better shadow detail in dark scenes
- Enhanced perception of three-dimensional depth
The combination of sharp resolution, adequate brightness, and high contrast ratio creates the immersive visual experience that defines premium home theater.
When selecting a projector, balance all three specifications based on your room. A 4K projector with 2,000 lumens and 10,000:1 contrast delivers excellent results in a dark theater room. For a brighter, multi-purpose room, prioritize 2,500+ lumens even if resolution is 1080p.
Pro tip: When comparing projectors, look for models that combine at least 1080p native resolution, 2,000 lumens for dark rooms or 3,000+ lumens for lit spaces, and a contrast ratio above 10,000:1 to ensure all three specifications work together for truly immersive viewing experiences.
3. Understanding Throw Distance and Room Size
Throw distance is the physical space between your projector and the screen, and it directly determines where you can place your projector in your room. Getting this measurement right ensures your screen displays the correct image size without distortion or quality loss.
What Is Throw Distance?
Throw distance measures the distance from the projector lens to your projection screen. This measurement, combined with your screen size, determines the projector's throw ratio, which indicates how the projector sizes images.
Understanding throw distance and placement helps you calculate exactly where your projector needs to sit to achieve your desired screen size. A projector with a 1.5 throw ratio requires less distance than one with a 2.5 throw ratio to fill the same screen width.
Throw distance impacts your room layout through:
- Fixed lens projectors have set throw ratios with no adjustment
- Zoom lenses provide flexibility with adjustable throw ratios
- Short throw projectors work in tight spaces
- Long throw projectors suit larger rooms
Measuring Your Room
Start by measuring your room's length from where you want your screen positioned back to where you could place a projector. Account for mounting hardware, cables, and proper ventilation around the projector.
Measure your desired screen width as well. A 100-inch screen is standard for immersive home theater. Use this measurement plus your throw distance calculation to determine if your projector placement is practical.
Key measurements include:
- Screen width in inches
- Available distance from screen to projector location
- Ceiling height for overhead mounting
- Wall space for screen placement
- Ventilation clearance around projector
Throw Ratio Explained
Throw ratio is a mathematical expression showing the relationship between throw distance and screen width. A 1.5 throw ratio means you need 1.5 feet of throw distance for every foot of screen width.
For example, a 100-inch screen requires different distances depending on throw ratio. A 1.5 ratio needs approximately 12.5 feet. A 2.5 ratio needs approximately 21 feet. These calculations help you match projector specifications to your available room space.
Throw ratio benefits for planning:
- 0.5 to 1.2 ratio: Short throw projectors for close placement
- 1.5 to 2.0 ratio: Standard throw for medium rooms
- 2.5 to 3.5 ratio: Long throw for large rooms
- Zoom ratios offer flexibility within a range
Matching your projector's throw distance capability to your available room space is essential for achieving the correct screen size and optimal viewing distance from your seating.
Practical Application for Your Setup
Measure from your planned seating area to where you want the screen. Work backward to identify realistic projector placement options. Verify your chosen projector's throw ratio works within these physical constraints.
Consider mounting your projector on the ceiling for cleaner aesthetics and to avoid blocking viewer sightlines. Ensure adequate clearance above for heat ventilation and dust management.
Pro tip: Use your room measurements and desired screen width to calculate exact throw distance needs before purchasing; this prevents costly returns and ensures your projector fits perfectly in your Malaysian home theater space.
4. Wireless Connectivity for Easy Streaming
Wireless connectivity transforms your home theater experience by eliminating cable clutter and enabling seamless content streaming from your devices. Bluetooth and Wi-Fi enabled projectors let you cast movies, shows, and presentations directly without physical connections.
Why Wireless Matters
Cables create visual mess and limit where you can place your projector and streaming devices. Wireless technology frees you from these constraints while maintaining reliable, lag-free performance for immersive viewing.
Wireless projectors simplify your setup significantly. You can move your phone or tablet anywhere in the room while maintaining connection. This flexibility is especially valuable in Malaysian homes where room layouts vary widely.
Understanding Bluetooth Connectivity
Bluetooth enables your projector to connect with wireless speakers, headphones, and personal devices without cables. This technology works over short distances and consumes minimal power, making it perfect for audio pairing and device control.
Bluetooth benefits include:
- Wireless speaker and headphone pairing for immersive audio
- Remote control functionality from your smartphone
- Easy connection to portable devices
- Reliable connection within 30 feet
- Minimal power consumption
Wi-Fi and Screen Mirroring
Wi-Fi connectivity allows your projector to receive video content directly from your phone, tablet, or computer through screen mirroring. Screen mirroring capabilities enable lag-free streaming of movies, apps, and presentations without visible delay or quality loss.
Most modern projectors support standard mirroring protocols like Miracast and AirPlay. This compatibility means your existing devices work seamlessly without special software or adapters.
Wi-Fi advantages for streaming:
- Lag-free video streaming from phones and tablets
- Support for multiple mirroring standards
- Direct Netflix, YouTube, and streaming app access
- No cables cluttering your entertainment space
- Reliable performance within your home network
Practical Streaming Examples
You can queue up a movie on your phone and begin watching on your massive projection screen in seconds. Switch between streaming apps without disconnecting. Pause on your phone and resume on your tablet.
During family gatherings, pass your phone around so everyone can share photos on the big screen. Business users appreciate wireless connectivity for presenting directly from laptops during client meetings in home offices.
Wireless connectivity eliminates installation complexity and cable management headaches while delivering reliable, seamless streaming experiences for movies, games, and presentations.
Network Stability Considerations
Your home Wi-Fi network strength directly impacts streaming quality. Ensure your router is positioned centrally and your projector receives strong signal. Keep your projector and streaming devices on the same 5GHz band for optimal performance and reduced interference.
Pro tip: Position your Wi-Fi router within line-of-sight of your projector and test your network speed before purchasing wireless projectors to ensure smooth, uninterrupted streaming without buffering or connection drops.
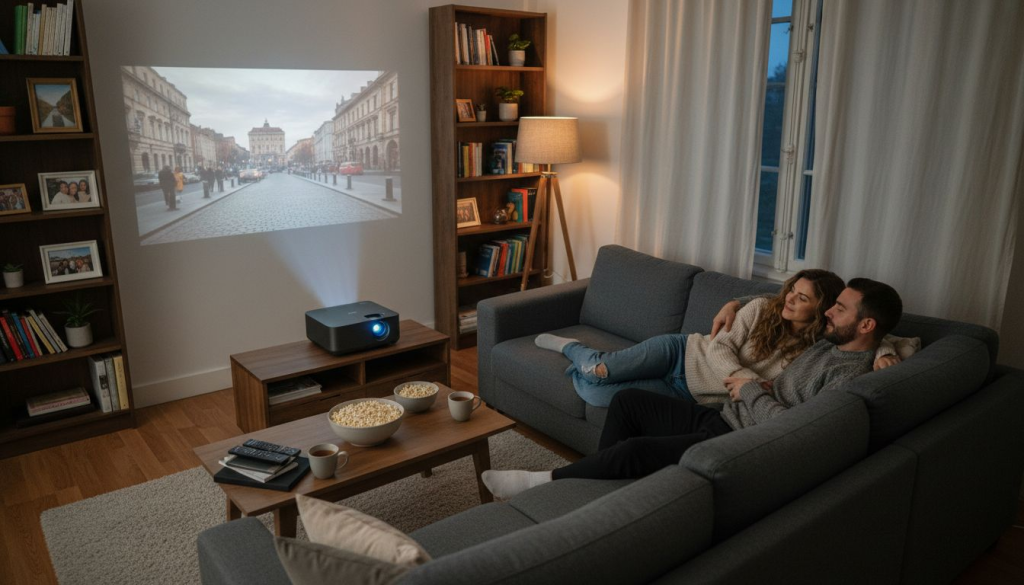
5. Optimizing Your Projector Setup and Screen Placement
Proper projector alignment and screen placement are critical for achieving sharp, distortion-free images that fill your entire viewing area. Even small adjustments to positioning and focus dramatically improve your home theater experience and reduce eye strain during extended viewing sessions.
Centering Your Projector
Position your projector centered relative to your screen for the sharpest image quality. Off-center placement creates uneven brightness and geometric distortion that degrades the viewing experience.
Measure your screen width and find its center point. Position your projector's lens directly in line with this center point. This alignment ensures even light distribution across the entire image.
Focus and Zoom Adjustments
Once your projector is positioned at the correct throw distance, adjust the focus ring until the image appears perfectly sharp. Blurry images indicate improper focus, not equipment failure.
Use your projector's zoom lens to adjust image size if it does not fill your screen perfectly. Proper projector mounting and alignment techniques ensure your image fills the screen without overshooting or undershooting.
Focus and zoom benefits include:
- Crystal clear text and fine details
- Properly sized images that fill your screen
- Reduced eye strain during extended viewing
- Even brightness across the entire image
Correcting Image Distortion
If your projector is not perpendicular to the screen, the image appears trapezoidal or keystone distorted. Keystone correction is a built-in feature that fixes this distortion electronically.
However, keystone correction reduces image resolution slightly. Optimal setup avoids heavy keystone correction by positioning your projector directly perpendicular to the screen initially.
Keystone correction guidelines:
- Minor corrections (under 10 degrees) are acceptable
- Significant corrections reduce sharpness noticeably
- Better to reposition projector than rely on heavy keystone correction
- Adjustments available in both horizontal and vertical directions
Screen Placement Optimization
Position your screen at a height where viewers' eyes naturally focus on the center when seated. A screen mounted too high causes neck strain. Too low creates viewing discomfort during longer viewing sessions.
Most home theater experts recommend screen center height at approximately eye level when seated. Leave adequate spacing above and below the screen for aesthetic balance in your room.
Proper projector alignment, focus adjustment, and screen placement combine to create a sharp, comfortable viewing experience that showcases your projector's capabilities to their fullest.
Minimizing Shadows and Glare
Ensure no objects block the light path from projector to screen. Position furniture and décor to avoid casting shadows on the projection surface.
Reduce ambient light reflection by choosing a screen material with appropriate gain rating. Higher gain screens work better in bright rooms. Lower gain screens provide better contrast in dark rooms.
Pro tip: Use a tape measure and level to verify your projector is positioned perpendicular to the screen, then make fine adjustments using focus and zoom controls rather than keystone correction to maximize image sharpness and preserve resolution quality.
6. Audio Solutions for Enhanced Theater Sound
Your projector displays the visual masterpiece, but quality audio transforms the experience into true cinema magic. Surround sound systems and spatial audio technologies create immersive soundscapes that match your stunning visuals and pull you deeper into the action.
Why Audio Matters for Home Theater
A beautiful image without quality sound leaves your home theater experience incomplete. Professional movie productions use sophisticated audio design with multiple speakers and channels to create directional sound cues that enhance emotional impact.
Your Malaysian home theater deserves audio equipment that complements your investment in a quality projector. The right sound system elevates movies, games, and music to theatrical standards.
Understanding Surround Sound Channels
Surround sound systems use multiple speakers positioned around your room to create directional audio. The most common setup is 5.1 surround, which includes a center channel, left and right front speakers, two surround speakers, and one subwoofer for bass.
Channel configuration benefits include:
- Center channel delivers clear dialogue from actors on screen
- Left and right channels handle music and ambient sounds
- Surround speakers create immersive background audio
- Subwoofer reproduces deep bass for impact and realism
- Additional channels enhance spatial awareness
Spatial Audio and 3D Sound Technologies
Spatial audio and 3D sound create realistic soundscapes by simulating natural sound environments with directional audio cues. These advanced technologies place sounds around and above you, matching visual action on your screen for total immersion.
When an explosion happens on the right side of your screen, you hear it coming from the right surround speaker. Birds flying overhead create sound that appears above your head. This directional audio realism dramatically increases viewer engagement.
Budget-Friendly Audio Solutions
You do not need to spend thousands for excellent home theater audio. Quality surround sound systems starting around $500 deliver exceptional clarity and immersive effects for most viewing scenarios.
Affordable audio options include:
- 5.1 surround speaker packages with integrated amplification
- Soundbars with wireless subwoofers for compact spaces
- Modular systems allowing gradual speaker upgrades
- Wireless Bluetooth connectivity for flexibility
- Easy installation without complex wiring
Speaker Placement for Optimal Sound
Position your center channel speaker directly below or above your screen at ear level when seated. Place left and right front speakers at 22 to 30 degrees from center. Position surround speakers at 90 to 110 degrees from center, elevated 1 to 2 feet above ear level.
Quality audio that matches your projector's visual quality transforms home theater from mere entertainment into an authentic cinematic experience that captivates everyone in the room.
Connectivity and Integration
Most modern surround sound systems connect via HDMI, optical audio, or wireless Bluetooth. Verify your projector has audio output capability before purchasing speakers. Many projectors have built-in audio that can connect to external amplifiers and speakers.
Pro tip: Start with a quality 5.1 surround sound system that balances audio clarity with your budget, then upgrade individual speakers over time as your home theater investment grows and your preferences develop.
7. Maintenance Tips for Long-Lasting Performance
Regular maintenance keeps your projector running smoothly for years while preserving image quality and brightness. Simple cleaning routines and preventive care prevent costly repairs and extend your equipment's lifespan significantly.
Cleaning the Projector Lens
Your projector lens is the gateway to sharp, vibrant images. Dust, fingerprints, and smudges accumulate over time, gradually degrading image clarity and brightness.
Always power off and unplug your projector before cleaning. Allow it to cool for at least 30 minutes to avoid burns or damage from residual heat.
Proper lens cleaning includes:
- Use canned air to blow away loose dust gently
- Wipe with a microfiber cloth in circular motions
- Avoid harsh chemicals that damage lens coatings
- Never touch the lens with bare fingers
- Clean monthly for best results
Understanding Internal Lens Care
Cleaning projector lenses properly prevents internal dust accumulation. However, internal lens cleaning is delicate and typically not user-serviceable without risking component damage.
Signs that internal cleaning is needed include persistent blurriness, visible dust specks inside the lens, color distortion, or unexplained brightness loss. Contact a qualified technician for internal cleaning rather than attempting it yourself. Professional service protects your warranty and prevents expensive damage.
Managing Heat and Ventilation
Projectors generate significant heat during operation. Proper airflow around your projector prevents overheating and component degradation that shortens equipment lifespan.
Ventilation considerations include:
- Ensure 6 inches clearance on all sides
- Keep intake and exhaust vents unobstructed
- Avoid mounting projectors in enclosed cabinets
- Use cooling fans if mounting in tight spaces
- Monitor temperature during extended use
Lamp and Filter Maintenance
Projector lamps have limited lifespans, typically 2,000 to 5,000 hours depending on model and usage. Track lamp hours through your projector's menu and plan replacement before failure occurs.
Air filters trap dust preventing internal contamination. Replace or clean filters every 100 hours of use. Clogged filters reduce cooling effectiveness and increase overheating risk.
Lamp and filter care benefits:
- Replace lamps proactively before brightness decreases
- Clean air filters monthly for optimal airflow
- Stock replacement lamps before you need them
- Keep warranty documentation for reference
Consistent maintenance transforms a projector from a short-term purchase into a dependable long-term investment that delivers stunning visuals year after year.
Cable and Connection Management
Inspect cables and connections monthly for damage or corrosion. Loose connections cause intermittent problems and poor image quality. Replace damaged cables immediately to prevent electrical hazards.
Store cables properly to prevent kinks and damage. Avoid running cables near heat sources or sharp objects that could compromise insulation.
Pro tip: Create a monthly maintenance calendar marking lens cleaning, filter inspection, and lamp hour checks; this simple habit prevents unexpected failures and keeps your projector performing at peak quality throughout its operational life.
Below is a detailed table summarizing the key aspects, features, and considerations discussed throughout the article.
| Projector Type | Features | Best Use Case |
|---|---|---|
| DLP (Digital Light Processing) | Sharp image clarity, compact design, and excellent motion handling. | Fast-action movies and sports in smaller rooms. |
| LCD (Liquid Crystal Display) | Bright images, vivid colors, and affordability. | Spaces with ambient light, general home theater use. |
| LCOS (Liquid Crystal on Silicon) | Superior contrast and smooth color transitions. | Dark, dedicated theater rooms for cinematic experiences. |
| Resolution | Determines image clarity and detail; includes Full HD and 4K options. | Studios or living rooms depending on screen type and viewer distance. |
| Brightness (Lumens) | Ensures visibility in various lighting conditions. | Rooms with differing ambient light levels. |
| Contrast Ratio | Enhances depth and dimension with deep blacks and vibrant colors. | Crucial for dramatic visuals and high-quality home theater setups. |
| Throw Distance and Ratio | Determines placement based on room dimensions and screen width. | Planning projector installation in spaces with limited or large layouts. |
| Wireless Connectivity | Enables streaming without cables via Bluetooth and Wi-Fi. | Modern setups requiring seamless integration with devices and apps. |
| Audio Integration | Spatial surround sound and proper speaker placement. | Elevating the home theater sound experience. |
| Maintenance Practices | Regular lens cleaning, lamp replacement, and filter cleaning. | Ensuring long-lasting performance and image clarity. |
Discover Your Perfect Home Theater Projector Today
Choosing the right projector for your home theater can feel overwhelming with so many options like DLP, LCD, and LCOS technologies to consider along with critical specs such as resolution, brightness, and throw distance. If you want sharp images, vibrant colors, and wireless streaming without the guesswork ProjectorDisplay.com offers a carefully curated selection of projectors designed for Malaysian homes that meet all these demands. Whether you are upgrading your dark dedicated theater or creating a bright multi-use space, our inventory covers portable, laser, short-throw, and smart projectors with features that align perfectly with your viewing priorities.

Ready to elevate your viewing experience with crystal-clear visuals and immersive sound? Explore our range at ProjectorDisplay.com where you can find detailed product information and expert advice all in one place. Don't wait to transform your home into the ultimate entertainment hub—start browsing now and enjoy fast shipping and dedicated support tailored for projector enthusiasts in Malaysia. Visit ProjectorDisplay.com and take the first step toward bringing cinematic magic into your living room.
Frequently Asked Questions
What should I consider when choosing a projector for an immersive home theater experience?
To achieve an immersive home theater experience, consider your room's lighting conditions, projector type, resolution, brightness, and contrast ratio. Assess your space and prioritize features like adequate brightness and high contrast to enhance the visual quality for your viewing environment.
How does resolution impact the viewing experience in home theater projectors?
Resolution significantly affects image clarity and detail; higher resolutions provide sharper images. For instance, opting for a 4K projector can enhance the viewing experience on larger screens compared to a 1080p model, especially when sitting closer.
What is the ideal brightness level for home theater projectors in various room settings?
The ideal brightness level varies by room lighting; for dark rooms, 1,500 to 2,000 lumens are ideal, while bright rooms require 2,500 to 3,500 lumens. Choose a projector that meets these lumen counts based on your specific room's lighting to ensure a clear, vibrant image.
How can I optimize the placement of my home theater projector for the best image quality?
To optimize image quality, position your projector directly centered in front of the screen, ensuring the lens aligns with the screen's center. Use a tape measure to confirm the appropriate throw distance based on your projector's specifications and your screen size.
What are the benefits of wireless connectivity in home theater projectors?
Wireless connectivity allows for easy streaming and eliminates cable clutter, enhancing your home theater setup. Use Wi-Fi or Bluetooth to connect your devices effortlessly, allowing for more flexible projector placement and seamless content sharing.
How often should I perform maintenance on my home theater projector to ensure long-term performance?
Regular maintenance should be performed monthly, including cleaning the lens and checking the air filter. This routine practice will help you maintain optimal image quality and prevent potential issues, extending your projector's lifespan significantly.
Recommended
- 7 Best Home Theater Projector Tips for Ultimate Viewing – Projector Display
- 7 Key Tips for Home Theater Systems with Projector and Screen – Projector Display
- 7 Best Projector Screens for Home Theater Enthusiasts – Projector Display
- 7 Essential Tips for Choosing 3D Projectors for Home – Projector Display