
Choosing the right mounting solution for your projector can feel overwhelming, especially when you're trying to create the perfect home theater experience in Malaysia. Many enthusiasts assume wall mounts or shelves are the default choice, but ceiling mounts ideal for dedicated theaters offer superior aesthetics and performance for permanent installations. This guide walks you through everything you need to know about projector ceiling mounts, from selecting the right type to installation and maintenance, helping you make an informed decision that transforms your viewing space.
Table of Contents
- Key takeaways
- Why choose a ceiling mount for your projector?
- Types of projector ceiling mounts and key features to consider
- Installing a projector ceiling mount: step-by-step guide for Malaysia homes
- Maintaining your projector ceiling mount and troubleshooting common issues
- Explore top projector products and installation guides at Projector Display
- Frequently asked questions
Key Takeaways
| Point | Details |
|---|---|
| Ceiling mount benefits | Ceiling mounts keep the projector out of sight, provide unobstructed sightlines and professional aesthetics for dedicated home theaters. |
| Installation practicality | Modern ceiling mounts use standardized patterns and installation typically takes two to three hours with basic tools. |
| Aesthetic integration | The projector becomes part of the room design rather than a visible device, enhancing the overall theater look. |
| Safety and cable management | Overhead mounting reduces the risk of accidental damage, keeps children and pets away, and allows clean cable management through ceiling channels. |
| Mount options overview | Fixed mounts provide simple stable support at a low cost while tilting mounts offer fifteen to twenty five degrees of vertical adjustment for post installation alignment. |
Why choose a ceiling mount for your projector?
Ceiling mounts transform your home theater by keeping your projector completely out of the way while delivering optimal image quality. Unlike shelf mounts that occupy valuable furniture space or wall mounts that can create awkward viewing angles, ceiling installations provide unobstructed sightlines and professional presentation. For Malaysian home theater enthusiasts with dedicated viewing rooms, ceiling mounts ideal for dedicated theaters with better aesthetics eliminate physical barriers between you and your screen.
The aesthetic advantages alone make ceiling mounts worth considering. Your projector becomes part of the room's architecture rather than a visible piece of equipment competing for attention. This clean integration matters especially when you've invested in theater seating, acoustic treatments, and ambient lighting design. The projector disappears into the ceiling, allowing your screen to become the focal point.
Many people hesitate because they worry about installation complexity or permanent ceiling modifications. These concerns are valid but manageable. Modern ceiling mounts use standardized mounting patterns that work with most projector models, and installation typically takes 2-3 hours with basic tools. The permanence actually becomes an advantage once you've optimized your setup, as your projector stays perfectly aligned without the drift or instability that can affect shelf-mounted units.
Ceiling mounts also protect your investment. Projectors mounted overhead stay away from curious children, pets, and accidental bumps that plague table-mounted units. Heat dissipation improves since warm air naturally rises away from the projector's intake vents. For those exploring ceiling projector home theater solutions, these practical benefits combine with aesthetic appeal to create the ideal mounting solution.
Pro Tip: Before committing to a ceiling mount, test your projector placement using a temporary stand or stack of books at the intended mounting height. This lets you verify throw distance, image size, and viewing angles before drilling any holes.
Key advantages of ceiling mounts include:
- Complete floor and furniture space freedom for flexible room arrangements
- Elimination of shadows from viewers walking between projector and screen
- Professional theater aesthetics that increase home value
- Reduced risk of accidental damage from daily activities
- Optimal cable management possibilities through ceiling channels
Types of projector ceiling mounts and key features to consider
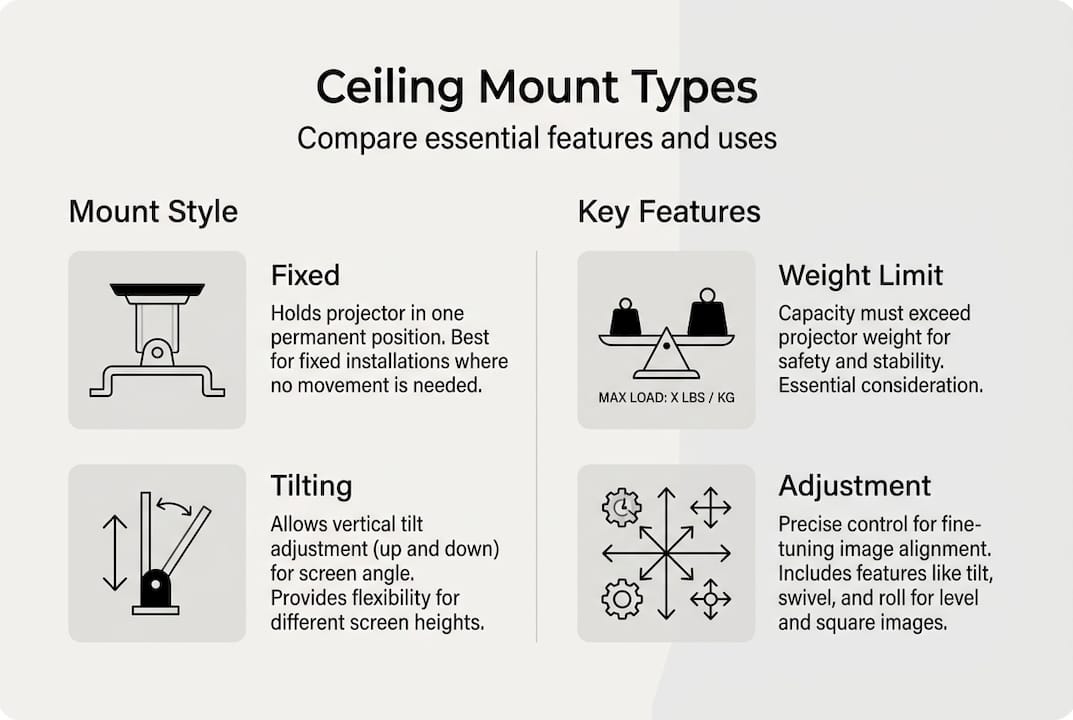
Understanding mount varieties helps you match your specific projector and room requirements. Fixed mounts provide the simplest, most stable option, attaching your projector to a rigid bracket with no moving parts. These work perfectly when you've finalized your screen position and projector placement, offering rock-solid stability at the lowest price point. Fixed mounts typically support 20-50 pounds and cost between RM 80-200 depending on build quality.
Tilting mounts add vertical angle adjustment, letting you fine-tune image alignment even after installation. This flexibility proves invaluable in rooms where ceiling height varies or when you need to account for screen placement that isn't perfectly perpendicular to the mounting point. Tilting mounts generally offer 15-25 degrees of vertical adjustment and cost RM 150-350. For top ceiling mount projectors Malaysia installations, tilting capability often justifies the modest price increase.
Full-motion mounts represent the premium category, providing pan, tilt, and sometimes rotation capabilities. These mounts suit multi-purpose rooms where you might need to redirect your projector toward different screens or walls. While offering maximum flexibility, full-motion mounts cost RM 400-800 and introduce more potential points of failure. Most dedicated home theaters don't require this complexity.
| Mount Type | Adjustment Range | Weight Capacity | Price Range (RM) | Best For |
|---|---|---|---|---|
| Fixed | None | 20-50 lbs | 80-200 | Permanent dedicated theaters |
| Tilting | 15-25° vertical | 25-55 lbs | 150-350 | Rooms needing angle adjustment |
| Full-Motion | Pan/tilt/rotate | 30-60 lbs | 400-800 | Multi-purpose spaces |
Build quality matters more than features. Steel construction beats aluminum for heavier projectors, while powder-coated finishes resist humidity better than painted surfaces, an important consideration in Malaysia's tropical climate. Check weight capacity against your projector's specifications, adding 20% safety margin for long-term reliability. Universal mounting patterns (typically 4-point or 6-point configurations) ensure compatibility, but always verify your specific projector model fits the mount's bracket spacing.
Ceiling type dramatically affects installation difficulty. Concrete ceilings common in Malaysian apartments require masonry bits and concrete anchors, while wooden ceiling joists in landed properties accept standard wood screws. Drywall or plasterboard ceilings need special attention since they can't support projector weight alone. You must locate ceiling joists or install backing plates that distribute weight across multiple joists. Ceiling mounts suit permanent installations but require proper structural support regardless of mount quality.
Throw distance and lens shift capabilities influence mount selection. Short-throw projectors need precise positioning since small mounting errors create large image misalignments. Standard throw projectors offer more positioning flexibility. If your projector has lens shift, you can correct for minor mounting imperfections electronically rather than physically adjusting the mount.
Pro Tip: Measure your projector's mounting hole pattern before purchasing any mount. Most manufacturers list this in specifications, but verifying with a ruler prevents compatibility issues that delay your installation.
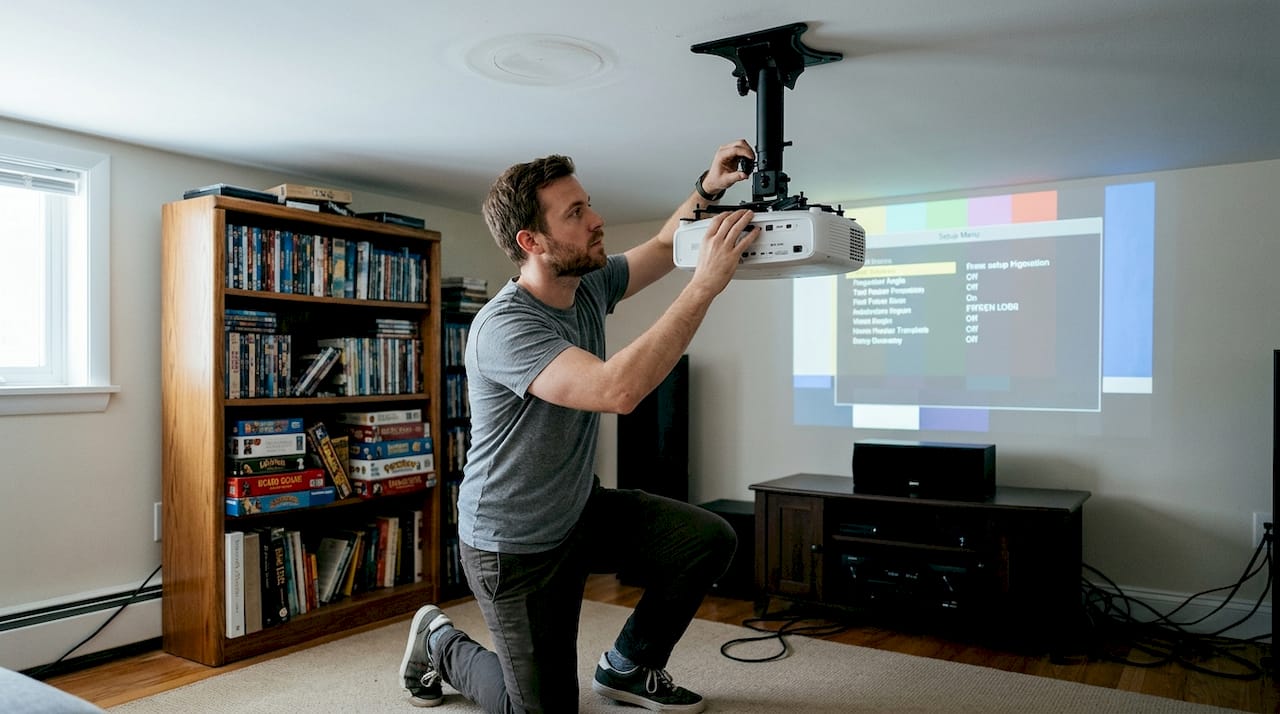
Installing a projector ceiling mount: step-by-step guide for Malaysia homes
Proper installation ensures your projector stays secure and properly aligned for years. Start by gathering essential tools: power drill with appropriate bits (masonry for concrete, wood bits for timber), stud finder for locating joists, measuring tape, level, pencil, safety glasses, and ladder tall enough to work comfortably at ceiling height. Malaysian hardware stores stock all these items, with quality drill bits costing RM 30-80 depending on ceiling material.
Assess your ceiling structure before marking any mounting points. Concrete ceilings require 8-10mm masonry bits and expansion anchors rated for at least twice your projector's weight. Timber ceilings need you to locate joists using a stud finder, as drywall alone can't support projector weight. Mark joist locations with painter's tape for easy reference. If joists don't align with your ideal projector position, install a backing plate (a piece of plywood secured across multiple joists) to create a solid mounting surface.
Follow these installation steps for optimal results:
- Calculate exact mounting position by measuring from your screen to determine proper throw distance, marking the ceiling point that centers your projector with the screen.
- Hold the mounting bracket against the ceiling at your marked position, using a level to ensure perfect horizontal alignment, then mark drilling points through the bracket holes with a pencil.
- Drill pilot holes at marked points, using appropriate bit size for your ceiling material, drilling 50mm deep for concrete or until you penetrate through drywall into the joist for timber ceilings.
- Insert anchors for concrete ceilings or prepare to drive screws directly into joists for timber, ensuring anchors sit flush with ceiling surface.
- Attach the mounting bracket using provided hardware, tightening screws in a star pattern to distribute pressure evenly and prevent bracket warping.
- Connect the projector plate to your projector's mounting points, verifying all screws are finger-tight before final tightening to prevent cross-threading.
- Lift the projector assembly and attach it to the ceiling bracket according to manufacturer instructions, having a helper support the projector weight during this step.
- Level the projector using built-in adjustment screws or the mount's leveling mechanism, checking alignment from multiple viewing positions.
- Power on the projector and display a test image, making fine adjustments to horizontal and vertical alignment using the mount's adjustment features.
- Route cables through the mount's cable management channels or along the ceiling to your power source and video inputs, securing cables with clips to prevent sagging.
Installation requires appropriate tools and considerations for Malaysian home ceilings, particularly regarding humidity and structural differences between apartment and landed property construction. For detailed visual guidance, check our projector mount installation guide with step-by-step photos.
Cable management deserves special attention during installation. Exposed cables dangling from your ceiling ruin the clean aesthetic that ceiling mounts provide. Run cables through the mount's integrated channels when available, or use cable raceways painted to match your ceiling color. For permanent installations in landed properties, consider running cables through the ceiling cavity to wall-mounted outlets. Our projector cable management tips cover creative solutions for different room configurations.
Pro Tip: Take photos of your ceiling before drilling, documenting the exact mounting location and any obstacles like electrical wiring or plumbing. These photos prove invaluable if you ever need to reinstall or troubleshoot issues.
Maintaining your projector ceiling mount and troubleshooting common issues
Regular maintenance keeps your ceiling-mounted projector performing optimally and prevents safety issues. Inspect mounting hardware quarterly, checking that all screws and bolts remain tight. Malaysia's humidity can cause metal fasteners to corrode over time, particularly in coastal areas. Apply a small amount of thread-locking compound to screws during installation to prevent vibration loosening, but avoid over-tightening which can strip threads or crack mounting brackets.
Dust accumulation affects both mount and projector performance. Clean the mount's exterior surfaces monthly using a microfiber cloth, paying special attention to adjustment mechanisms that can bind when dust mixes with lubricants. While cleaning the mount, inspect your projector's air intake and exhaust vents, as ceiling mounts offer aesthetics but require periodic checking for secure fittings and clean operation. Blocked vents cause overheating that shortens lamp life and can trigger thermal shutdowns during movies.
Image alignment issues often develop gradually as buildings settle or mounting hardware loosens slightly. If you notice keystone distortion where your rectangular image appears trapezoidal, first check whether your projector has shifted position. Loosen the mount's adjustment screws, realign the projector perpendicular to your screen, then retighten. Electronic keystone correction can compensate for minor misalignment, but physical alignment always produces superior image quality.
Vibrations or wobbling during action scenes indicate loose mounting hardware or inadequate ceiling support. Immediately inspect all connection points, tightening any loose screws. If vibrations persist after tightening, your ceiling may lack sufficient rigidity. Installing a backing plate that spans multiple joists distributes weight more effectively and eliminates flex. Never ignore vibrations, as they stress mounting points and can lead to catastrophic failure.
Common troubleshooting scenarios include:
- Image drift over time: Retighten all mount adjustment points and verify ceiling anchors haven't loosened in their holes
- Uneven image corners: Check projector level in both horizontal and vertical planes using a digital level for precision
- Overheating warnings: Verify adequate clearance around projector vents and clean dust from intake filters
- Cable connection issues: Inspect cables for strain or pinching at the mount connection point, replacing damaged cables immediately
- Mount creaking sounds: Apply white lithium grease to adjustment mechanisms and verify structural support adequacy
Know when professional help makes sense. If you discover ceiling damage, notice cracks near mounting points, or lack confidence in your ceiling's load-bearing capacity, consult a structural specialist before continuing use. For complex installations involving cathedral ceilings, concrete structural beams, or integrated home automation, professional installers ensure code compliance and warranty protection. Learn more about optimizing projector mounting for various room configurations and challenges.
Explore top projector products and installation guides at Projector Display
Setting up your ideal home theater requires quality equipment and reliable guidance. Projector Display offers Malaysia's most comprehensive selection of projectors, ceiling mounts, and accessories designed for local conditions and preferences. Whether you're building a dedicated theater room or upgrading an existing setup, you'll find products that match your specific requirements and budget.

Our projector sale products feature competitive pricing on premium brands, making professional-quality home theater accessible. Beyond products, we provide detailed resources including our projector installation guide 2026 covering everything from initial planning through final calibration. Fast shipping throughout Peninsular Malaysia and responsive WhatsApp support ensure you get expert assistance whenever you need it.
Frequently asked questions
What is the best ceiling mount type for a small Malaysian home theater?
Tilting mounts work best for small rooms because they let you adjust the projection angle after installation, compensating for limited placement options. Fixed mounts cost less and provide excellent stability if you've confirmed your projector position is final. For rooms under 12 feet long, tilting capability helps you achieve proper screen alignment despite space constraints.
Can I install a ceiling mount projector in a rental property without damaging the ceiling?
Ceiling mounts require drilling permanent holes, which typically violates rental agreements and forfeits security deposits. Shelf or wall mounts recommended for renters offer temporary solutions that don't damage property. Portable projector stands provide another alternative, though they sacrifice the clean aesthetic of permanent mounting.
How high should my projector ceiling mount be installed?
Install your mount 8-12 feet high depending on your room dimensions and projector throw ratio. Higher mounting works for larger rooms and longer throw projectors, while shorter distances suit compact spaces with short-throw models. Ensure clear line of sight to your screen with no obstructions like ceiling fans or light fixtures interrupting the projection path.
How do I maintain my projector ceiling mount for safety and performance?
Check all mounting screws and bolts every three months for tightness, as vibrations gradually loosen hardware. Clean dust from the mount and projector vents monthly to prevent overheating that degrades performance. Inspect ceiling anchors annually for signs of stress or damage, particularly in humid environments where corrosion can weaken connections over time.
Recommended
- Optimize Your Home Theater with Projector Mounting Options – Projector Display
- How to Mount Projector for Optimal Home Viewing Experience – Projector Display
- How to Install a Projector Mount for Perfect Viewing – Projector Display
- Ceiling mounted TV projector guide 2026: Choose & install – Projector Display