
Nearly half of all households experience WiFi dead zones that disrupt daily tasks and streaming. Reliable wireless coverage makes work, entertainment, and smart home devices run smoothly, yet many people struggle to get consistent signals in every room. Whether you are trying to improve video calls or stop buffering during movie night, you can transform your home network with the right strategies. This guide shows you simple steps that deliver stronger, more reliable WiFi throughout your entire space.
Table of Contents
- Step 1: Assess Current WiFi Coverage In Your Space
- Step 2: Optimize Router Placement For Better Coverage
- Step 3: Adjust Settings And Update Router Firmware
- Step 4: Install WiFi Extenders Or Mesh Systems
- Step 5: Test WiFi Stability Across All Devices
Quick Summary
| Key Point | Explanation |
|---|---|
| 1. Assess WiFi coverage areas | Map out WiFi performance with a site survey to identify strong and weak signal zones. |
| 2. Optimize router placement | Position your router centrally and elevated to maximize coverage and minimize interference. |
| 3. Update settings and firmware | Regularly check for firmware updates and adjust channel settings to enhance network speed. |
| 4. Use extenders or mesh systems | Implement extenders or mesh networks to eliminate dead zones and improve overall signal strength. |
| 5. Test WiFi stability regularly | Conduct tests across devices and locations to ensure consistent connectivity and identify weak spots. |
Step 1: Assess Current WiFi Coverage in Your Space
Getting a clear picture of your home WiFi performance starts with a strategic wireless network assessment. In this step, you will map out exactly how your current WiFi signal performs across different areas of your home or workspace.
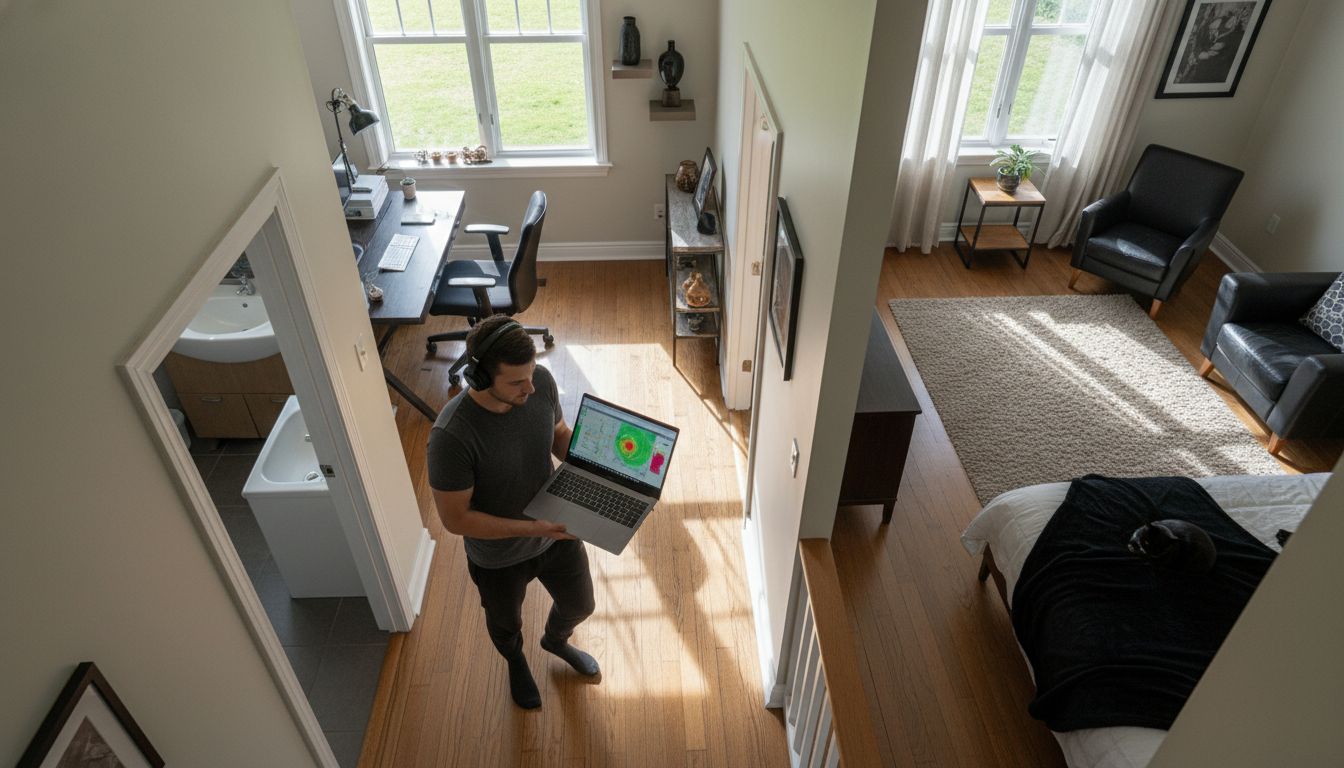
A wireless site survey helps you understand signal strength and potential dead zones. According to Wikipedia, this process involves analyzing your physical space and identifying optimal network performance zones. To start, grab your smartphone or laptop and walk through each room, checking signal bars and conducting simple speed tests.
One powerful tool for this assessment is NetSpot, a software that can comprehensively map your WiFi coverage. This tool scans your network, measuring radio signal strength and helping you visualize exactly where your connection is strongest or weakest. Pay special attention to areas far from your router, near thick walls, or in multi level spaces.
Pro tip: Stand in different locations and run multiple speed tests.
 Note areas where streaming buffers, video calls drop, or download speeds crawl. These are your WiFi weakness zones that need attention in future optimization steps.
Step 2: Optimize Router Placement for Better Coverage
Router placement is a critical yet often overlooked factor in achieving seamless WiFi performance throughout your home. Your goal in this step is to strategically position your router to maximize signal strength and minimize dead zones.
According to TP-Link, positioning your wireless router in a central location is key to maximizing coverage. Think of your router like a radio transmitter broadcasting signals aim to place it in an elevated spot near the center of your living space. This allows signals to radiate more evenly across rooms and floors.
As recommended by Tom's Guide, avoid placing your router near high powered electronic devices like microwaves, cordless phones, or metal objects that can interfere with signal transmission. Ideally, choose an open shelf or mounting location that provides a clear line of sight to most areas you want to cover.
Pro tip: If you have a multi story home, try positioning the router on the middle floor. This helps distribute signals more effectively across upper and lower levels. Each adjustment you make brings you closer to that perfect WiFi blanket covering your entire space.
Step 3: Adjust Settings and Update Router Firmware
Taking control of your router's performance goes beyond physical placement. This step will help you fine-tune your network settings and ensure your router is running at peak efficiency.
According to Singtel, regularly updating your router's firmware is crucial for both performance and security. Start by logging into your router's admin panel typically accessed through a web browser using the default IP address (often 192.168.0.1 or 192.168.1.1). Look for a firmware update section and check for available updates that can improve speed, fix bugs, and patch security vulnerabilities.
InsationTech recommends adjusting your router's channel settings to reduce interference. Most routers automatically select channels, but manually switching to less crowded channels can significantly improve your WiFi performance. For 2.4GHz networks, try channels 1, 6, or 11. For 5GHz networks, experiment with different channels to find the clearest signal.
Pro tip: Enable Quality of Service (QoS) settings to prioritize critical applications like video calls or streaming. This ensures important network traffic gets bandwidth preference over less critical tasks. With these tweaks, you are transforming your router from a basic device to a performance powerhouse.
Step 4: Install WiFi Extenders or Mesh Systems
When your existing router struggles to cover every corner of your home, WiFi extenders and mesh systems become your secret weapons for comprehensive network coverage. This step will guide you through selecting and implementing the right solution to eliminate those frustrating dead zones.
According to Tom's Guide, implementing a mesh WiFi system can dramatically eliminate dead zones by providing consistent coverage throughout your home. These systems work differently from traditional extenders they create a unified network where multiple nodes communicate seamlessly, essentially blanketing your entire space with strong, reliable signals.
Singtel recommends placing mesh devices strategically between your main router and areas with weak signals. Aim to position these nodes within line of sight or separated by no more than one wall. Think of them as signal relay stations that hand off your internet connection smoothly as you move through your home.
Pro tip: When setting up mesh systems, start with the main node near your existing router and gradually place additional nodes in areas where your initial WiFi coverage assessment showed weak signals. Each node you add should improve your network's overall performance and reach.
![]()
Step 5: Test WiFi Stability Across All Devices
With your network optimized, the final step is verifying that your WiFi performs consistently across every device and location in your home. This comprehensive testing will confirm whether all your previous optimization efforts have paid off.
According to Wikipedia, specialized WiFi assessment tools like NetSpot allow users to perform detailed network scanning and surveys. These tools help you analyze coverage and performance by generating comprehensive heat maps that visualize signal strength throughout your space. Run multiple tests at different times of day using various devices such as smartphones, laptops, tablets, and smart home gadgets to ensure uniform connectivity.
Wireless Site Survey research emphasizes the importance of testing for radio frequency interference and assessing signal strength across different areas. Pay special attention to devices in challenging locations like home offices, bedrooms, or areas far from your router. Run speed tests, check latency, and monitor connection stability to identify any remaining weak spots that might need additional attention.
Pro tip: Create a simple spreadsheet to track your test results. Note device type, location, time of day, download speed, upload speed, and any connection drops. This documentation will help you pinpoint persistent issues and make targeted improvements to your home network.
Elevate Your Home WiFi and Visual Experience Today
Struggling with unreliable WiFi that disrupts your streaming and work can be frustrating. Optimizing your router placement, updating firmware, and adding mesh systems work wonders but pairing these improvements with high-quality display technology transforms your entire home setup. Imagine seamless video calls and buffering-free streaming showcased on crisp, vibrant projectors designed for your living space.

Discover a range of projectors at ProjectorDisplay.com crafted to complement your enhanced WiFi environment. Whether you want portable convenience, full HD clarity, or smart connectivity options, our selection supports uninterrupted viewing experiences. Act now to upgrade your home network and display together and enjoy crystal clear visuals without compromise. Explore our variety of projectors and related accessories to create your perfect home theater or workspace today.
Frequently Asked Questions
How can I assess the current WiFi coverage in my home?
To assess your current WiFi coverage, walk through your home using a smartphone or laptop to check signal strength in each room. Conduct speed tests in areas where you experience buffering or slowdowns and note any dead zones that need improvement.
What steps can I take to optimize my router placement for better coverage?
To optimize your router placement, position it in a central, elevated location away from electronic devices that may cause interference. This helps ensure a more even distribution of the WiFi signal throughout your home.
How can I adjust my router settings to improve WiFi performance?
You can improve WiFi performance by regularly updating your router's firmware and manually selecting less crowded channels. Log into your router's admin panel and look for firmware updates, then adjust channel settings to minimize interference and enhance speed.
What are the benefits of using a WiFi extender or mesh system?
Using a WiFi extender or mesh system can dramatically improve coverage in areas where your main router struggles to reach. These devices help eliminate dead zones by creating a seamless network with strong signals throughout your space.
How do I test WiFi stability across all devices in my home?
To test WiFi stability, run multiple speed tests on different devices at various times of day in different locations. This will help you identify any remaining weak spots and ensure that your optimization efforts have resulted in stable, reliable connectivity.
What should I do if I still have weak WiFi signals after following these steps?
If you still experience weak WiFi signals, consider repositioning your router, adding more extenders or mesh nodes, and testing for interference from nearby devices. Continue to monitor speeds and stability across all areas until you achieve consistent performance.
Recommended
- Wireless Screen Mirroring in Malaysia: 2025 Guide for Entertainment, Education, and Business – Projector Display
- Wifi vs HDMI untuk Projektor: Pilihan Terbaik di Malaysia – Projector Display
- Fungsi WiFi dalam Projektor untuk Hiburan dan Kerja – Projector Display
- Best Wireless Screen Mirroring Projector Guide 2025 – Projector Display