
Swapping out an Epson projector lamp can sound intimidating. Each lamp has a limited lifespan and when it fails, your crisp presentations or movie nights turn into a dark, blurry mess. But most people are surprised to learn you only need a few basic tools and about 30 minutes of patience—with a simple screwdriver and the right replacement lamp, nearly anyone can do it safely and smoothly at home. Forget expensive repair shops, because this step-by-step process is more manageable than you think.
Table of Contents
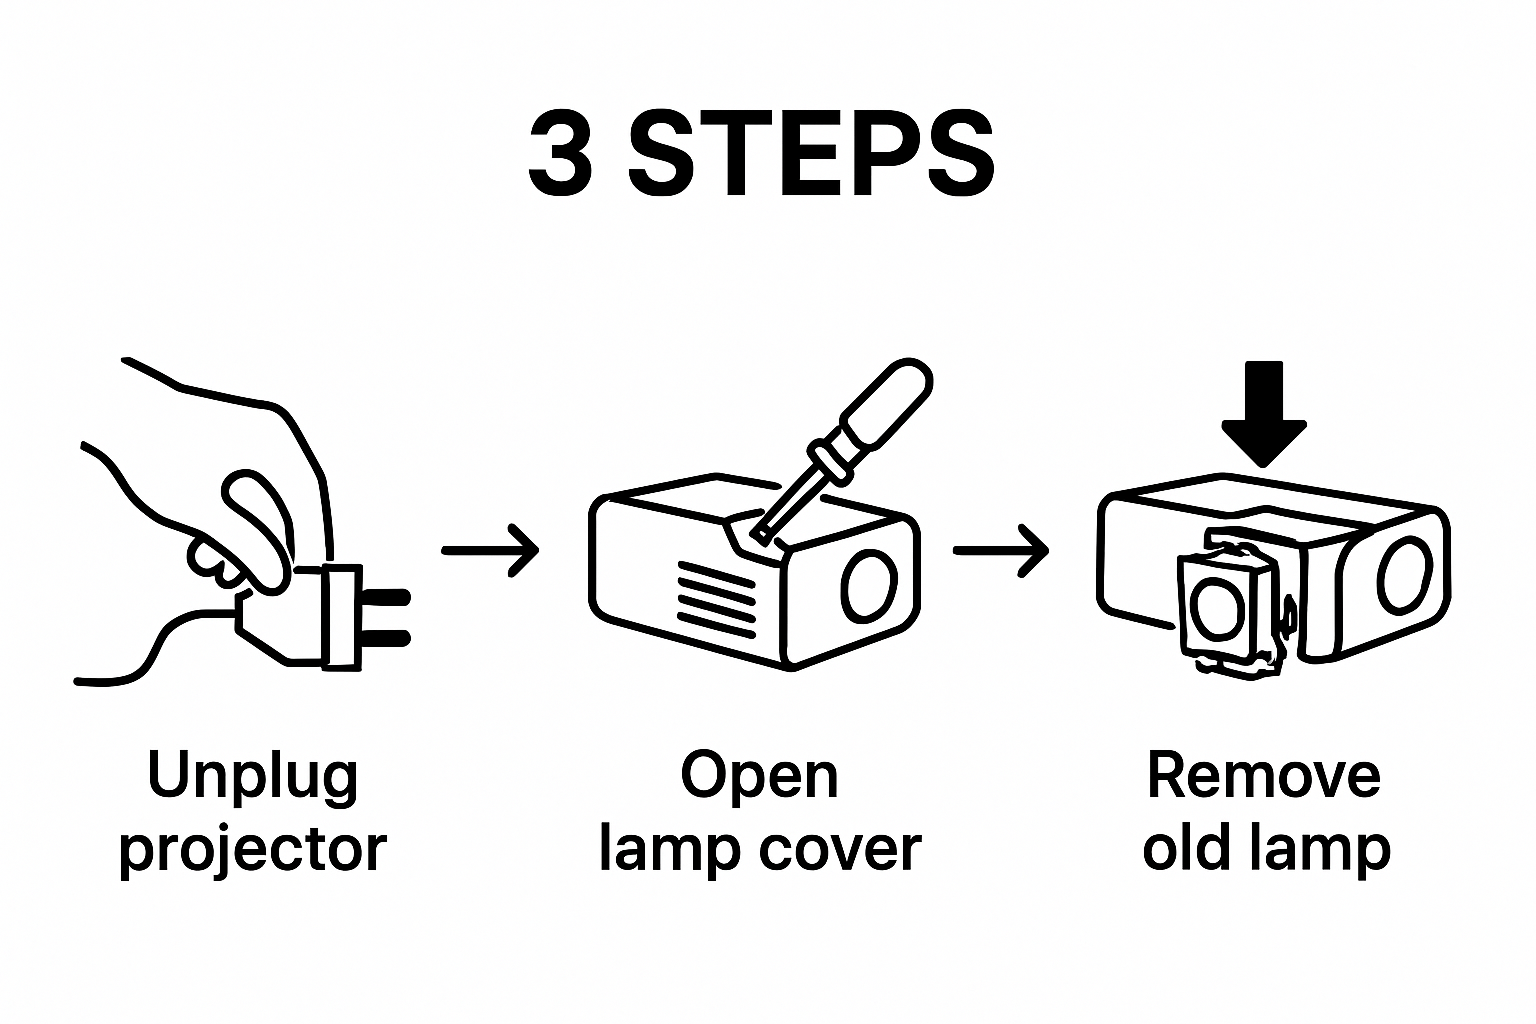
- Step 1: Gather Necessary Tools And Supplies
- Step 2: Power Off And Unplug The Projector
- Step 3: Access The Lamp Compartment
- Step 4: Remove The Old Lamp Carefully
- Step 5: Install The New Lamp Securely
- Step 6: Test The Projector And Verify Functionality
Quick Summary
| Key Point | Explanation |
|---|---|
| 1. Power Off Projector Completely | Ensure the projector is completely powered down and unplugged to prevent electrical hazards during maintenance. |
| 2. Gather the Right Tools | Collect necessary tools including a Phillips screwdriver and replacement lamp specific to your projector model. |
| 3. Handle New Lamp Carefully | Avoid touching the glass surface of the new lamp to prevent oils from skin affecting performance. |
| 4. Securely Install New Lamp | Align and install the new lamp without forcing it, tightening screws gently to ensure a stable connection. |
| 5. Test Projector Post-Installation | Verify functionality by checking for image clarity and resetting the lamp timer to ensure optimal performance. |
Step 1: Gather Necessary Tools and Supplies
Replacing an Epson projector lamp requires careful preparation and the right equipment. Before diving into the replacement process, assembling the correct tools and understanding the workspace will ensure a smooth and successful lamp change.
First, power down and unplug your projector completely. This means disconnecting the power cord from both the projector and the electrical outlet. Allow the projector to cool down for at least 30 minutes. Projector lamps generate significant heat during operation, and attempting to replace the lamp while it's still warm can lead to potential burns or damage to the equipment.
You will need several specific tools for this task. Here are the essential items to gather:
- Phillips head screwdriver (size No. 2)
- Clean, soft lint-free cloth
- Work surface with good lighting
- Replacement Epson projector lamp (specific to your projector model)
- Disposable gloves (optional but recommended)
Before removing the old lamp, carefully inspect your work area. Choose a clean, flat surface with ample space to lay out your tools and the projector. Good lighting is crucial for seeing small components and ensuring you don't drop or misplace any screws during the replacement process.
This table organizes the required tools and materials for replacing an Epson projector lamp, specifying their purpose to help you prepare efficiently.
| Tool/Material | Specification | Purpose |
|---|---|---|
| Phillips Head Screwdriver | Size No. 2 | Remove and tighten screws |
| Replacement Epson Projector Lamp | Model-specific | Restore projector brightness |
| Lint-Free Cloth | Clean, soft | Wipe dust or debris |
| Work Surface | Flat, well-lit | Provide stable workspace |
| Disposable Gloves | Optional, nitrile or latex | Prevent skin oil on lamp |
When selecting your replacement lamp, precision matters. Verify the exact model number of your Epson projector and purchase a compatible lamp specifically designed for that model. Using an incorrect lamp can result in poor projection quality or potential damage to your device.
According to Wayne County Technology Department's guidance, handling the lamp module requires extra care. When loosening screws, ensure you're holding the module securely to prevent accidental dropping or damage.
Lastly, consider wearing disposable gloves during the process. This helps prevent oils from your skin transferring onto the new lamp, which could potentially reduce its lifespan or cause uneven heating when in use. Having all tools ready and understanding the preparation steps sets the foundation for a successful projector lamp replacement.
The following table summarizes each main step in the Epson projector lamp replacement process, highlighting the goal, estimated time, and important cautions for a clear overview.
| Step | Main Goal | Estimated Time | Important Caution |
|---|---|---|---|
| Gather Tools & Supplies | Prepare all materials and workspace | 5 minutes | Use only compatible replacement lamp |
| Power Off & Unplug | Ensure device is safe to handle | 5 minutes | Let projector cool at least 30 minutes |
| Access Lamp Compartment | Expose lamp for removal | 5 minutes | Carefully remove cover to avoid damage |
| Remove Old Lamp | Take out used lamp safely | 5 minutes | Hold lamp to prevent accidental dropping |
| Install New Lamp | Securely fit new lamp module | 5 minutes | Avoid touching glass surface |
| Test Projector | Confirm proper operation | 5 minutes | Reset lamp timer after installation |
Step 2: Power Off and Unplug the Projector
Safety is paramount when replacing an Epson projector lamp. Properly powering down and disconnecting your projector prevents potential electrical hazards and ensures a smooth lamp replacement process. This critical step protects both you and your valuable equipment from unexpected electrical complications.
Completely shut down the projector by using the power button, not just the remote control. Most Epson projector models have a dedicated power button that requires you to press and hold for 2-3 seconds until the device fully powers down. Watch for the indicator lights to confirm the projector has completely turned off. Avoid using quick power-off methods that might interrupt the internal cooling systems.
After powering down, unplug the power cord from both the projector and the electrical outlet. This double disconnection ensures zero electrical current flowing through the device. Pull the plug directly from the wall socket rather than just disconnecting from the projector itself. This extra precaution eliminates any residual electrical charge that might pose a risk during the lamp replacement.
Allow the projector to cool down completely before beginning the replacement process. Heat management is crucial. Projector lamps generate significant thermal energy during operation, and attempting to replace the lamp while components are still warm can lead to potential burns or damage to sensitive internal mechanisms. A good rule of thumb is to wait at least 30-45 minutes after the last use before starting the replacement.
According to Indiana Wesleyan University's Projector Maintenance Guide, proper power management prevents electrical risks and ensures safe equipment maintenance. If you want to learn more about maintaining your projector, our comprehensive guide to projector care offers additional insights.
Verify that the projector is completely powered down by checking these signs:
- No operational indicator lights are illuminated
- Power cord is fully disconnected from both projector and wall outlet
- Projector surface feels cool to the touch
- Remote control does not activate any projector functions
By meticulously following these power-off steps, you create a safe environment for replacing your Epson projector lamp, minimizing risks and preparing for a successful maintenance procedure.
Step 3: Access the Lamp Compartment
Accessing the lamp compartment requires precision and careful attention to your specific Epson projector model. Different projector series have unique design features, so understanding your device's specific configuration is crucial for a successful lamp replacement.
Begin by examining the projector's exterior for the lamp compartment cover. Most Epson models have a clearly marked panel, typically located on the side or top of the device. Look for small icons or labels indicating the lamp access area. Some models might require removing a small panel by sliding or pressing a release mechanism, while others might need you to unscrew a protective cover.
Before attempting to open the compartment, ensure you have your Phillips head screwdriver ready. Gently apply pressure and observe how the cover is attached. Some covers slide horizontally, while others might require a slight lifting motion. Apply steady, even pressure to avoid damaging the projector's casing. If you encounter resistance, stop and double-check that you're using the correct opening technique for your specific model.
According to Wayne County Technology Department's maintenance guide, when loosening the lamp module screws, be prepared for the module to potentially fall out. Hold the module carefully to prevent accidental dropping or damage. The screws are typically captive, meaning they remain attached to the module even when fully loosened.
If you want more detailed insights into projector maintenance, check out our comprehensive lamp replacement guide for additional tips and model-specific advice.
Verify you've successfully accessed the lamp compartment by confirming these indicators:
- Lamp compartment cover is fully removed
- Internal lamp module is visible and accessible
- No additional obstructions block the lamp module
- Screwdriver is ready for the next step of removal
Take a moment to visually inspect the compartment before proceed ing. Look for any dust, debris, or signs of previous wear that might impact the new lamp's installation. Gentle cleaning with a soft, lint-free cloth can help ensure a clean environment for the new lamp. Remember, each projector model has its unique nuances, so patience and careful observation are key to a successful lamp replacement process.
Step 4: Remove the Old Lamp Carefully
Removing the old projector lamp demands precision, patience, and a gentle touch. This critical step requires careful handling to prevent damage to both the lamp module and the projector's internal components. Your goal is to extract the old lamp without causing any additional stress or potential breakage.
Position yourself comfortably with good lighting and a clear view of the lamp compartment. Hold the projector steady and use your Phillips head screwdriver to carefully loosen the mounting screws. Most Epson projector models have captive screws, meaning they remain attached to the lamp module even when fully loosened. Apply gentle, consistent pressure and avoid forcing the screws if they seem tight.
As you begin to remove the screws, maintain a firm grip on the lamp module. The module can potentially fall out quickly, so keeping a steady hand is crucial. Some projector models might require a slight pulling or sliding motion to completely detach the lamp. Pay close attention to any potential resistance and move slowly to prevent unexpected movement that could damage the projector's internal connections.
According to Wayne County Technology Department's maintenance guide, extra caution is needed, especially if the projector is ceiling-mounted. The lamp module can easily fall if not properly supported during removal. If you want more comprehensive guidance, explore our detailed lamp replacement resource for additional insights.
Once you've loosened the screws, carefully pull the lamp module straight out. Avoid tilting or twisting the module, which could cause damage to the delicate internal connections. If the module seems stuck, double-check that all mounting screws are completely loosened and that you're pulling in the correct direction.
Verify successful lamp removal by confirming these key points:
- Lamp module is completely detached from the projector
- No visible damage to the lamp module or projector interior
- Mounting area is clean and free of dust or debris
- Screws remain attached to the lamp module
- No resistance when removing the module
Handle the old lamp with extreme care. Place it on a soft, clean surface away from any potential impact zones. Some lamp modules contain fragile components that can be easily damaged if dropped or mishandled. Remember, the goal is a smooth, careful removal that prepares you for installing the new lamp in the next step of the replacement process.
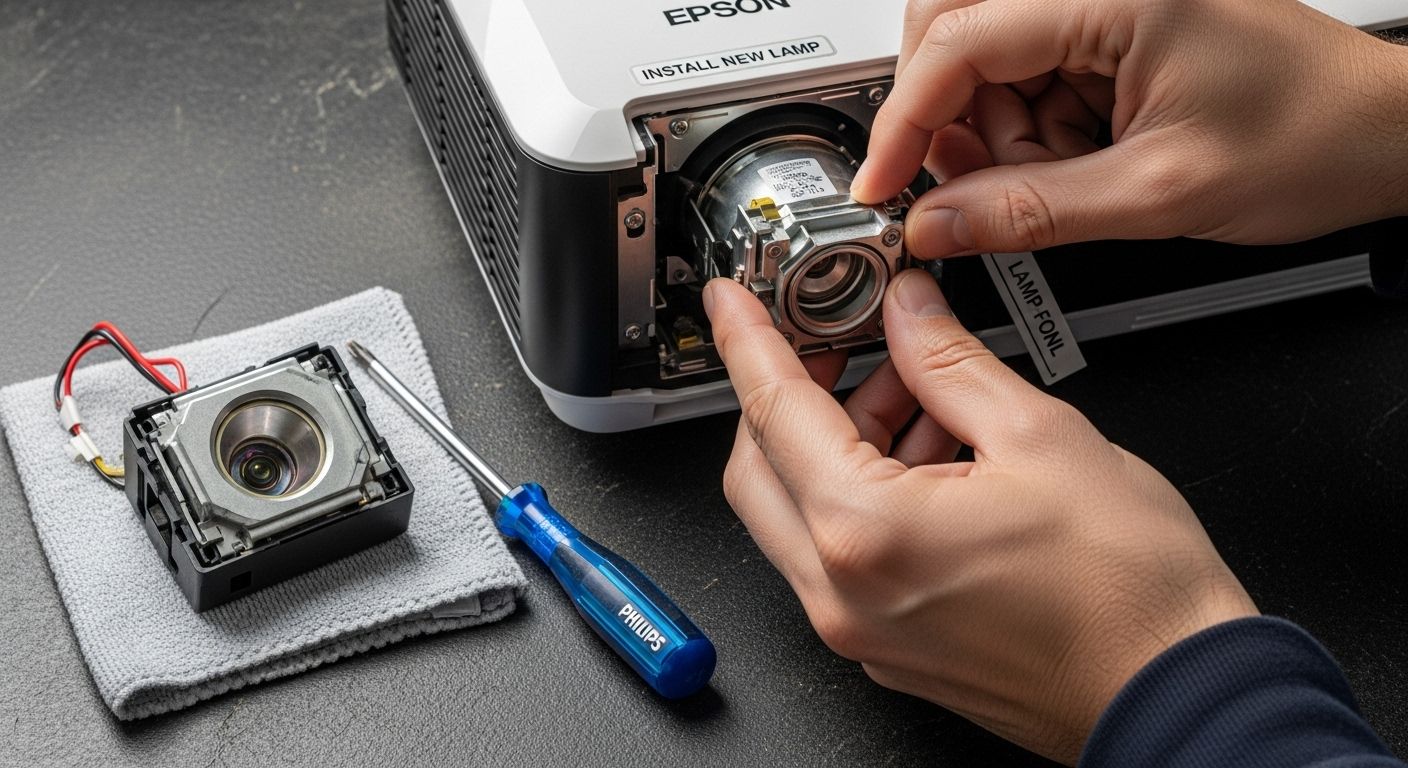
Step 5: Install the New Lamp Securely
Installing the new Epson projector lamp is a delicate process that requires precision, attention to detail, and careful handling. This critical step will ensure your projector functions optimally and maintains its performance integrity. The goal is to place the new lamp module exactly as the old one was positioned, creating a secure and stable connection.
Begin by examining the new lamp module carefully. Compare its orientation with the old lamp you just removed. Most Epson projector lamps have specific alignment markers or keying mechanisms that prevent incorrect installation. Handle the lamp by its edges, avoiding direct contact with the glass surface. The oils from your skin can create hot spots on the lamp, potentially reducing its lifespan or causing uneven illumination.
Slide the new lamp module into the compartment with steady, even pressure. Ensure perfect alignment before pushing it completely into place. You should feel a slight resistance when the module reaches its correct position. If you encounter significant resistance, stop and double-check the orientation. Forcing the module could damage both the lamp and the projector's internal connections.
According to Wayne County Technology Department's maintenance guide, the next crucial step is securing the lamp module. Use your Phillips head screwdriver to tighten the mounting screws. Apply consistent, gentle pressure to ensure the screws are snug but not over-tightened. If you want more comprehensive guidance, explore our detailed lamp replacement resource for additional insights.
Verify the successful installation by checking these critical points:
- Lamp module sits flush with the projector interior
- All mounting screws are securely tightened
- No visible gaps or misalignment
- Module does not wobble or move when gently tested
- Electrical contacts appear clean and undamaged
Replace the lamp compartment cover carefully, ensuring it clicks or slides into its original position. Take a moment to visually inspect the area, making sure no tools or debris remain inside the projector. The precision of this installation directly impacts your projector's performance, light quality, and overall longevity. A well-installed lamp sets the stage for clear, bright projection in your next presentation or movie night.
Step 6: Test the Projector and Verify Functionality
Testing your projector after lamp replacement is a critical final step that ensures all your careful work has successfully restored the device's performance. This verification process will confirm that the new lamp is functioning correctly and that no additional issues have emerged during the replacement procedure.
Reconnect the power cord and prepare for the initial startup. Plug the projector directly into the wall outlet, avoiding power strips or extension cords for this initial test. Turn on the projector using the main power button, not the remote control. Watch carefully during the startup sequence for any unusual sounds, flickering, or error messages that might indicate a problem with the lamp installation.
Once the projector powers on, run a comprehensive visual test. Project a high-contrast image or test pattern that will reveal any potential lamp or projection issues. Check for consistent brightness, color accuracy, and image clarity. Pay special attention to the corners and edges of the projected image, looking for any uneven illumination or dark spots that might suggest improper lamp installation.
According to Indiana Wesleyan University's Projector Maintenance Guide, it's crucial to reset the lamp timer after installation. Most Epson projector models have a specific menu option to reset the lamp usage hours. If you want to explore more about optimizing your projector's performance, check out our comprehensive video projection guide.
Verify the projector's functionality by examining these key points:
- Projector powers on without error messages
- Image appears crisp and evenly illuminated
- No unusual noises during operation
- Color reproduction appears natural and consistent
- Lamp timer has been successfully reset
Listen carefully during the first few minutes of operation. The new lamp should produce a steady, consistent light without any popping, buzzing, or intermittent flickering. If you notice any unusual sounds or visual anomalies, power down immediately and double-check the lamp installation. A properly installed lamp should provide clear, bright projection with minimal noise.
Below is a checklist table to help verify that your Epson projector is functioning correctly after completing the lamp replacement process.
| Verification Step | What to Check | Success Indicator |
|---|---|---|
| Power Connection | Projector powers on | No error messages |
| Image Quality | Brightness and clarity | Even illumination, natural color |
| Sound | Unusual noises | No popping or buzzing |
| Physical Check | Lamp module stability | No wobble or misalignment |
| Lamp Timer | Usage hours reset | Lamp timer displays zero or new value |
Get Your Epson Projector Shining Bright Again—The Smart Way
Are you facing dim visuals or sudden interruptions because your projector lamp needs replacing? You know how important it is to follow each step with care, from cooling down your device to securing the new lamp without damaging sensitive parts. Mistakes during lamp replacement can lead to cloudy displays or even permanent damage, which affects your presentations and peace of mind. To keep your projector delivering crisp images, you need reliable parts, detailed guides, and trusted support.

Why wait and risk a mishap or reduced picture quality? Shop for genuine projector accessories and discover expert tips at ProjectorDisplay.com. Explore our Projector Screen collection for the perfect visual match and keep all your gear safe with our Projector Bag and Case selection. Take the first step to flawless projection. Visit us now and enjoy fast shipping, curated deals, and responsive customer support—your complete solution for everything projector-related in Malaysia.
Frequently Asked Questions
What tools do I need to replace my Epson projector lamp?
You will need a Phillips head screwdriver, a clean, soft lint-free cloth, a replacement Epson projector lamp compatible with your model, and optional disposable gloves to prevent oil transfer during handling.
How do I safely power down my Epson projector before replacing the lamp?
Completely shut down the projector using the dedicated power button and unplug the power cord from both the projector and the wall outlet. This prevents any electrical hazards during the lamp replacement.
What should I do if the new lamp isn't fitting into the projector properly?
Ensure the new lamp module is correctly aligned with the orientation markers. If it doesn't fit, double-check that there are no obstructions or that the module is not being forced in, as this could damage internal components.
How do I reset the lamp timer after replacing the projector lamp?
After installation, access your projector's menu and locate the lamp timer reset option. Follow the prompts in the menu to reset the lamp usage hours to ensure accurate tracking for future lamp replacements.